Filters
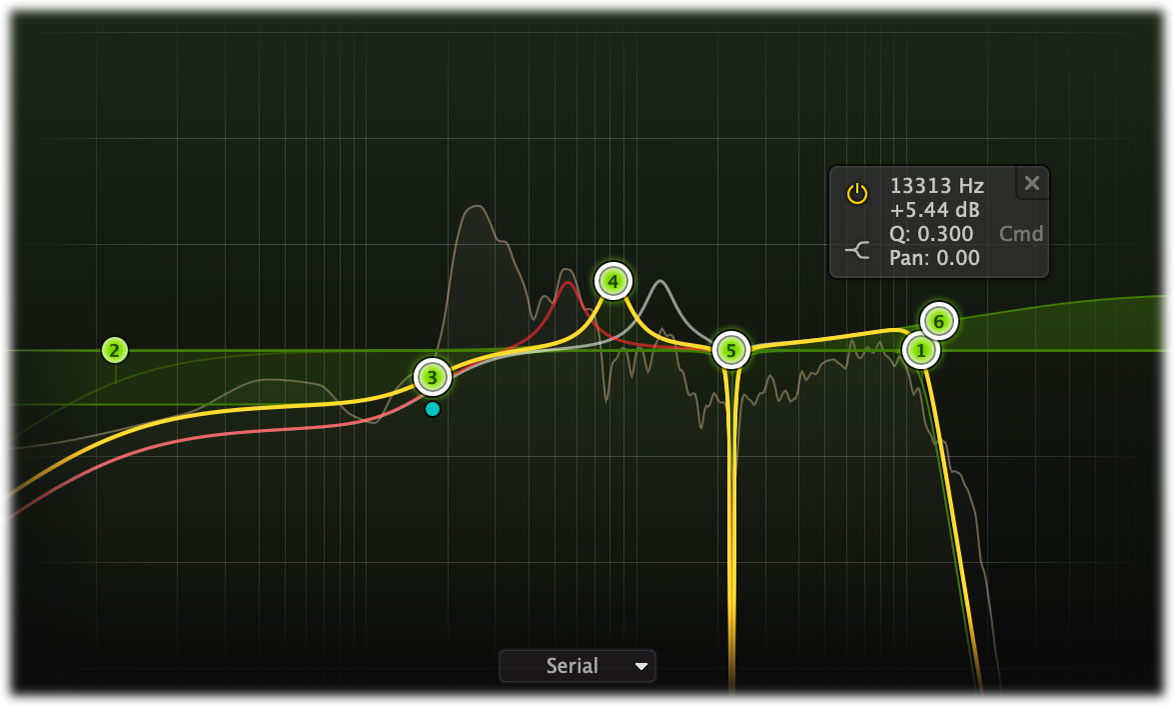
The interactive filter display at the top right of the interface lets you add up to six high-quality filters.
When set to low pass, high pass or band pass, these are analog-like, self-oscillating filters, full of character and with internal saturation. The other filter shapes (bell, shelf or notch) are clean
EQ-style filters. Most of the filter parameters (frequency, gain, Q, panning), can be modulated, which
allows for a wide range of creative possibilities.
The thick yellow curve shows the overall frequency response of the filters. The display
looks simple and straightforward, but holds a lot of intelligence and smart features. We strongly
recommend to take some time to read this topic and learn about all its options and shortcuts.
All properties of the filters can be easily controlled via the filter display, either by clicking and
dragging, or via the parameter value display. Here's how it works.
Creating filters
- To add a new filter, simply click on the yellow overall curve and drag it up or down.
- Alternatively, double-click or Ctrl-click (Command-click on macOS) on the display
background.
The shape of newly created curves is determined automatically depending on where you click,
and once you get used to this, it's a real time-saver! Do you need a Notch? Just
double-click in the far low area of the display. Want a Low Cut or High Cut filter? Double-click
in the far left or far right areas. Shelving filter? Drag the yellow curve at the left or right
end of the display.
Selecting filters
- Click the filter's dot or the colored area around it to select it.
- Click and drag on the display background to select adjacent filters by
dragging a rectangle around them.
- Hold down Ctrl (Command on macOS) and click another dot to
select multiple filters. Hold down Shift and click a dot to
select a consecutive range of filters.
- Deselect all filters by clicking anywhere on the display background.
Adjusting and editing filters
Once you have selected one or more filters, the display highlights the shapes of the selected
curves. You can easily make adjustments by simply dragging them around:
- Click and drag a selected dot to adjust the frequency and
gain of all selected filters. If you have multiple filters selected, the gain of
all selected filters will be scaled relative to each other.
- Move the mouse wheel to adjust the slope of LP/HP filters or the Q setting for
other shapes, making the selected filters narrower or wider. This works while dragging or
when the mouse pointer is above a curve. Alternatively, adjust the Q of all selected filters
by holding down Ctrl (Cmd on macOS) while dragging vertically.
- Move the mouse wheel while holding down Ctrl (Cmd on macOS) to adjust
the gain.
- Hold down Ctrl (Cmd on macOS) and drag horizontally to adjust
panning of the selected filters. Filter panning lets you filter the left and right
channels differently. It works as a stereo balance setting for the center frequency of the
filter. For example, when you set panning to a negative value, the left channel will
be filtered with a lower center frequency, and the right channel will be filtered with
a higher center frequency. You can use this to create various stereo filtering effects,
especially in combination with modulation.
- Hold down Shift while dragging (or while using the mouse wheel) to fine-tune
the settings of the selected filters.
- Hold down Alt while dragging to constrain to horizontal
adjustments (frequency) or vertical adjustments (gain).
- Hold down Alt and click the dot on a filter once to toggle its
bypass state (enabling or disabling the filter).
- Hold down Ctrl+Alt (Cmd+Alt on macOS) and click the dot on a
filter once to change its shape.
- Hold down Alt+Shift and click the dot on a filter once to change its
slope.
- Double-click a dot to enter values in the parameter display (using
the Tab key to step through Frequency, Gain, Q and Pan) or double-click the values
in the parameter value display directly. Note that you can enter frequencies in various ways,
like "100", "2k", "A4" or "C#2+13".
- If you right-click on the dot for a filter, a pop-up menu appears with
various filter settings. This is a quick way to modify the filter while you're working in the
display.
Filter parameter display
Next to each filter's dot in the display, the parameter display shows the exact parameter
values for the filter, along with quick controls to bypass or delete, and change
its shape or slope. You can double-click a value in the display directly to edit it.
Most of the filter parameters (frequency, gain, Q, panning), can be modulated. Just drag
a source on to a line in the filter's value display, or to the filter dot directly to modulate the frequency.
Filter routing
Internally, the filters are placed after the delay, but before feedback is routed to the
input. So with every delay feedback repetition, the signal will be filtered more and more.
Using the Filter Routing button at the bottom of the filter controller, the filters
themselfs can be routed in three different ways:
- Serial: all (active) filters are simply applied one after another (like in a regular EQ).
- Parallal: all filters receive the same input (i.e. the output of the delay stage) and are
then summed together.
- Per-channel: Odd filters (1, 3, 5) are only applied to the left channel, and even
filters (2, 4, 6) only to the right channel. Using this, you can apply completely different
filtering in left and right channels, which can result in very interesting effects, especially
with higher amounts of cross-feedback.
Tips
- The low-pass, high-pass and band-pass filters are analog-like, resonating filters full of character. With these filters, the parameter value display lets you set the style of the filter, choosing between ten different styles from Classic to Raw, Tube or Gentle. The additional Clean style selects a clean EQ-type filter without saturation.
- When filter modulation is taking place, the display will show the modulated result curve as a thin yellow curve that gets fuzzy for quick modulation.
- If filter panning is in effect, two additional thin result curves will show the overall filtering curve for each channel: grey/red in left/right mode, or green/blue in mid/side mode.
Next: Modulation
See Also
Overview