Compressors can be intimidating when you start working with them for the first time. Luckily, many compressors share the same basic set of controls. Once you're familiar with these basics you'll be able to work with almost any compressor you'll come across. Let’s take a look at the most fundamental controls of a compressor and their functions.
Transfer curve, threshold and ratio
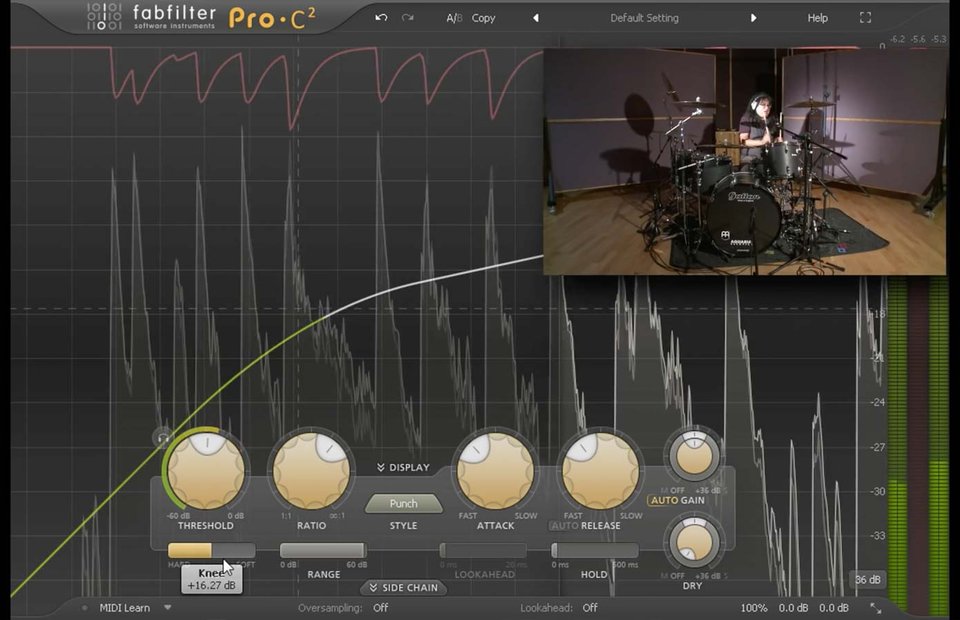
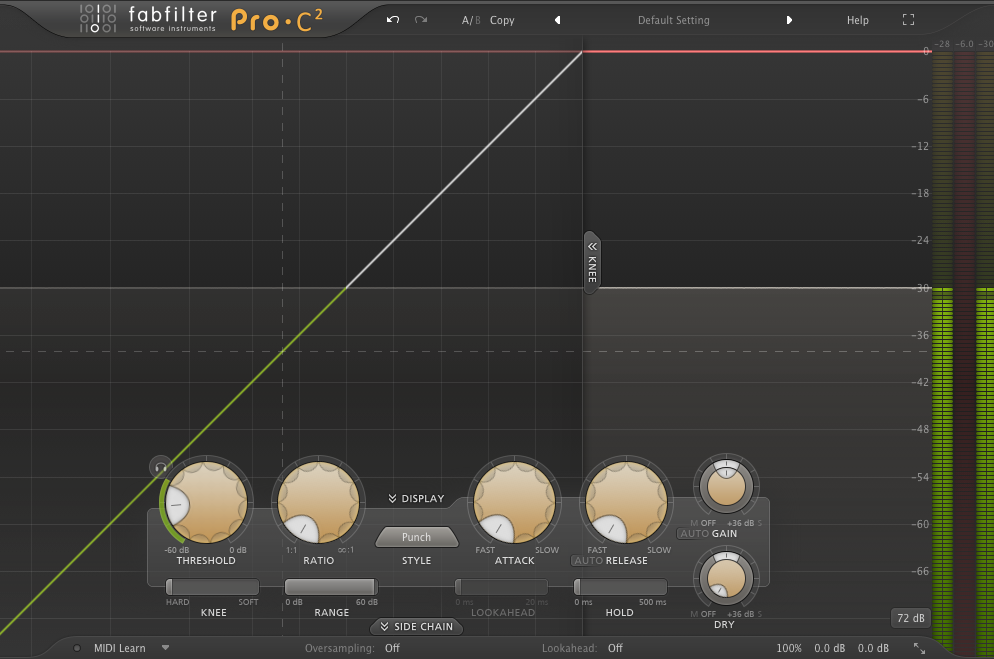
A compressor monitors the input signal's level. When the input level exceeds a set threshold, the compressor reduces the gain of the output signal. The transfer curve shows us the input vs. output relationship, visualizing the threshold and ratio settings. Looking at the illustration below, we can see that the input level is plotted on the x axis and the output on the y axis. FabFilter Pro-C 2 displays an input level of -30dB and at the output we can see that the same -30dB will come out (ratio of 1:1). In this case the transfer curve will be just a straight line. Increasing the ratio will tilt the transfer curve above the threshold turning down the output.
The threshold of a compressor is defined as the level above which gain reduction begins to occur. How much reduction is applied depends on the ratio setting (ratio of the input vs output).
For a ratio of 4:1 it means that for every 4 dB above the threshold at the input only 1 dB will appear at the output.
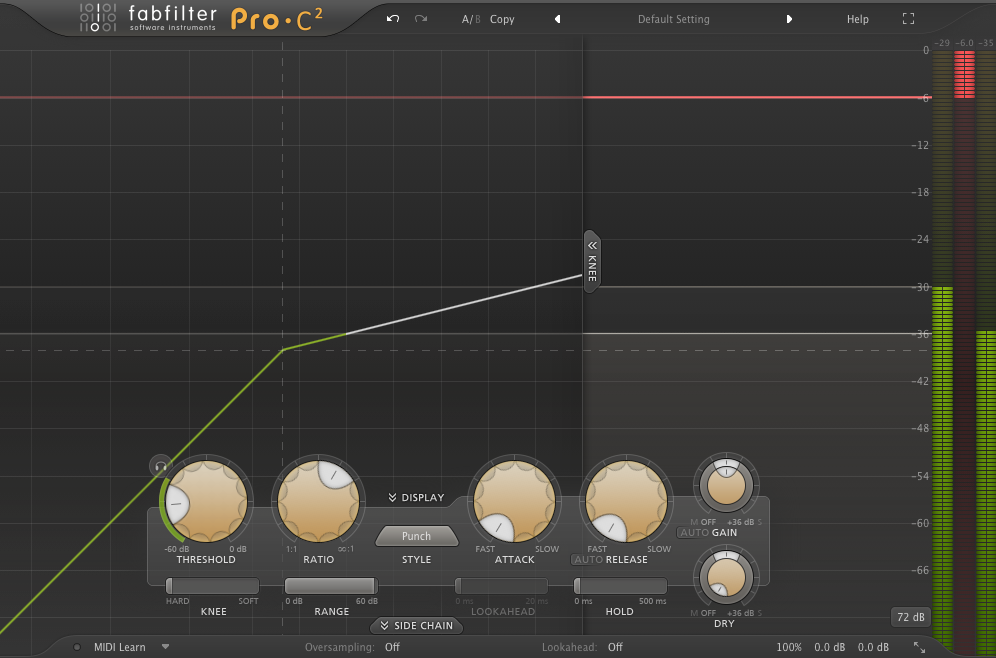
Looking at the picture below we can see that with an input signal of -30dB and our threshold set at -38dB our input signal is 8dB above our threshold. This means that with a 4:1 ratio, we’ll end up with an effective output level of -36dB. Recall that for every 4dB above our threshold only 1dB will come out, thus our effective gain reduction is 6dB.
Attack and release
When it comes to a compressor's attack and release controls, a lot of beginner engineers get confused and don’t understand how much of an effect these controls have on the signal. The trick about understanding these controls is to train your ears to identify specific sonic qualities of a sound. A common workflow for setting a compressor's controls is setting the attack first, then setting the release.
In short, the attack control determines how quickly the compressor responds to the incoming input signal while the release control determines how fast the compressor returns to unity gain following compression. Spending some time with a basic drum loop will clearly illustrate what effect these controls have on your audio. They can be used to highlight the attack, control attacks, or increase the sustain.
Let's take a look at an example. Start with a track that has a lot of transient information (e.g drums, plucked guitar, percussion etc). Lower the threshold to apply fairly heavy gain reduction (±10dB) and use a ratio anywhere from 4:1 to 8:1. Since we initially want all transient information to come through, set the attack to the slowest setting and the release its fastest setting. A slow attack will ensure the initial transient will come through before compression kicks in while the fast release ensures that the output gain is back to 90-100% once the next transient hits.
Gradually, try using shorter and shorter attack times and listen to the results. A faster attack time will cause the compressor to respond more quickly and attenuate the initial transients. Turning down the volume of the transients will cause the instrument to lose some of its attack. While attenuating transient information is something you could be aiming for, be aware that removing too much transient information will cause your mix to lose impact, especially if done on multiple tracks. A good starting point is to let all initial transients through and adjust until you find the sweet spot between taming transients and letting them through. Pro-C 2’s innovative level display can also help you to visualise what’s happening to the transients in real-time.

Attack and release controls are to be approached with awareness; if you set the attack too fast, you will lose your initial transients, if your release is too slow you're still applying gain reduction when the next transient is hitting.
After setting the compressor's attack we can focus on finding the right release setting. Shortening a compressor's release time allows the compressor to recover from gain reduction more quickly, which can make the sustain of your instrument more apparent. However, if the release time is too long it might not be able to let the initial transient of your next note/hit through causing your track to effectively stay at one level. For this reason, release time is often tied to tempo.
A common way to set up the compressor is by making sure that the gain reduction is back to 90-100% of its original signal before the next event passing the threshold hits. This allows the initial attack to come through and effectively causes your compressor to “breathe” in time with your song. When you take this concept to its extremes it is referred to as pumping.
Attack and release controls are to be approached with awareness; if you set the attack too fast, you will lose your initial transients, if your release is too slow the next transient will be attenuated.
Attack and release controls are often expressed in milliseconds. Although knowing these values can be helpful for reference, try not to get hung up on them. Different compressors and different algorithms respond to signals in different ways. A much better tactic is to focus on finding the best balance with the fewest unmusical side effects and adjust the attack and release controls by ear.
Cycle through the following audio examples of the same drumloop to get a quick illustration on different attack and release settings with the same threshold and ratio.