FabFilter Pro-L 2 online help
Table of contents
Go to sectionFabFilter Pro-L 2 Help
Introduction
Using FabFilter Pro-L 2
Full Screen mode, resizing and scaling
Presets
Purchasing FabFilter Pro-L 2
Support
Loudness metering
In the early 90s the introduction of digital signal processors and better limiters allowed engineers to increase perceived audio levels in a recording (i.e. loudness) significantly. And because “louder” is generally perceived as better, naturally many engineers tried to push loudness to the limit, which led to the loudness war. Many engineers in the music and broadcast industry believe that this race for audio level led to a point where the quality of the audio was jeopardized, sacrificing quality for level.
One of the problems is that peak measurements are not a good way to describe the loudness of a piece of audio, so normalizing audio to a maximum peak level doesn't work well. What's needed is a way to measure loudness as the human ear perceives it, and use this for loudness normalization. An early attempt is the K-system (see Metering) developed by Bob Katz, but the most commonly used standards today like EBU R128 and ATSC A/85 are based on the ITU-R BS.1770-4 standard.
The ITU-R BS.1770-4 standard describes a way of pre-filtering the audio signal to mimic the way the human ear perceives different frequencies, together with a way to calculate the average (RMS) signal level and use it to calculate a loudness level for an audio fragment of any length. This loudness level is expressed in LUFS (Loudness Units Full Scale) and is typically combined with true peak level metering.
FabFilter Pro-L 2 implements this standard and offers elaborate loudness metering. Simply set the Meter Scale button to Loudness to enable it. This opens the loudness panel at the righthand side of the interface:
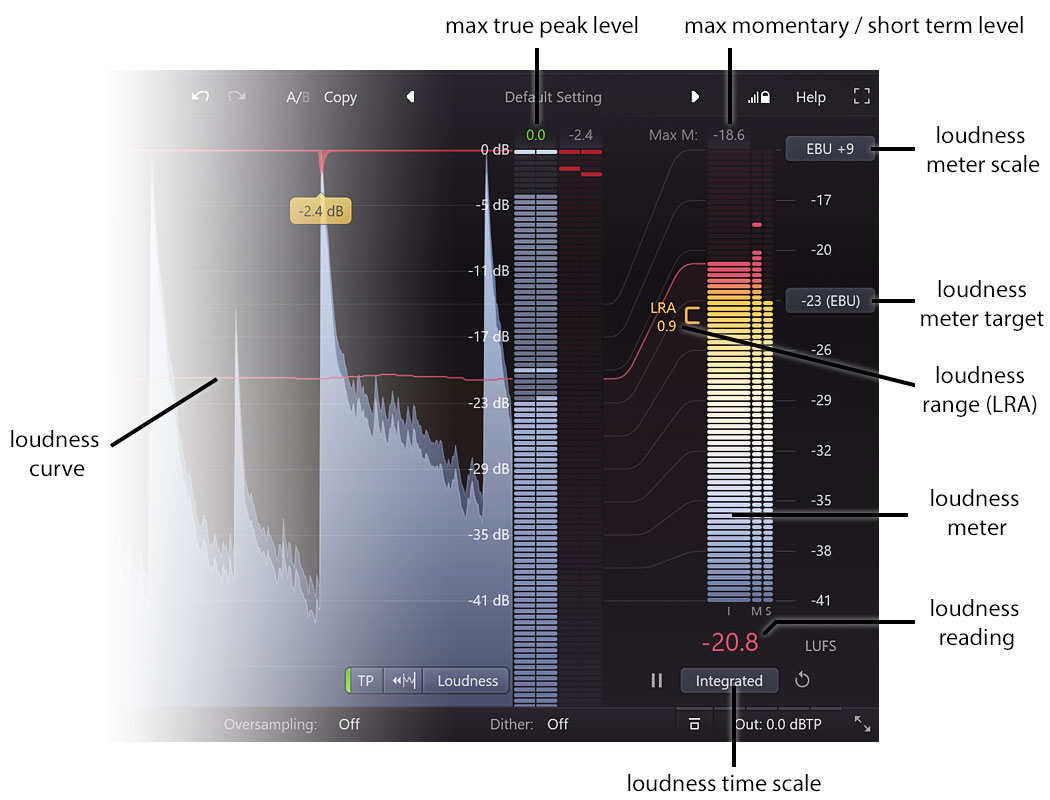
- The Loudness Meter Target button sets the desired target level in LUFS. The following common target levels are available as preset options: -9 LUFS (commonly used for audio CDs), -14 LUFS (roughly the target level used by streaming services like Spotify, iTunes or YouTube), -23 LUFS (the EBU R128 standard), or -24 LUFS (ATSC A/85 and TR-B32 standards). Click Custom in the menu that appears to enter a custom target level. Roughly speaking, the loudness target is the desired value for the Integrated loudness measurement (see below).
- The Loudness Time Scale button at the bottom chooses which loudness time scale is displayed prominently in the loudness meter: Momentary for a continuously changing reading that reflects the current loudness level, Short Term for a more slowly changing level that represents the overall loudness of the current audio, and Integrated for a long-term measurement that combines all audio analyzed by the meter since the last reset. The Integrated measurement gives the overall loudness of an entire song, album or movie and this is the value that is should end up at the chosen loudness target when performing loudness normalization.
- The Loudness Meter Scale button selects the desired meter scale: either +9 or +18 LU above the chosen loudness target level. These scales comply with the EBU mode from the EBU R128 standard and if you have chosen the -23 LUFS target, the meter scale button shows the required "EBU +9" or "EBU +18" labels. In addition, the menu that pops up also lets you change the meter scale between absolute and relative readings (in this case, the target level is shown as zero).
- The loudness meter displays the chosen loudness measurement prominently, next to the other two time scales that are shown as small bars. Below the loudness meter, the loudness reading displays the loudness as a text readout.
- The loudness curve displays the overall loudness over time in the real-time level display. Because the loudness meter doesn't use the same scale as the output meter and the level display, curved lines indicate how the scales are related to each other.
- Just like in the regular metering modes, the maximum true peak level is displayed above the output meter if you have True Peak Metering enabled with the TP button next to the meter scale button. See Metering.
- Above the loudness meter, the maximum momentary or maximum short term level is displayed. When the Integrated loudness time scale is used, you can select which one you want to see with the Max M / Max S button next to the peak reading.
- If the time scale is set to Integrated, the loudness range (LRA) is also displayed to the left of the loudness meter. This is a measure for the variation of the loudness over time as defined by the EBU R128 standard.
- You can pause or reset the loudness measurements with the small buttons at the sides of the time scale button. The reset button also resets the maximum peak and gain reduction readings on the regular meters. To reset automatically when the host starts playback, enable the Auto-Reset option in the menu for the time scale button.
How you should use this set of loudness measurements depends on the purpose of the audio you're working on. For example, you might need to comply with the EBU R128 standard for broadcasting. In this case, you would choose the -23 LUFS target level. By tweaking the gain slider, you can make sure the integrated loudness ends up at the target with a tolerance of +/- 1 LU. In addition, the maximum true peak level should not exceed -1 dBTP: you can simply enable True Peak Limiting and set the Output Level to -1 dBTP to achieve this.
When preparing music for a streaming service such as Spotify, you would choose the -14 LUFS target level and vary the gain to achieve an integrated loudness measurement that roughly matches this target level. Again, we recommend to enable True Peak Limiting and True Peak Metering and set the Output Level to -1 dBTP to make sure the maximum true peak level does not exceed -1 dBTP.
Notes
- There are four revisions of the ITU-R BS.1770 standard. In revision 2, the concept of gated loudness measurement was added, which reduces the influence of very soft passages on the overall integrated loudness level. FabFilter Pro-L 2 implements ITU-R BS.1770-4 which also describes how to weigh surround channels properly. Pro-L 2 always uses gated measurements because it is a more robust way to measure loudness.
- To use Pro-L 2 in EBU mode (as part of the EBU R128 standard) you need to 1) set the Loudness Meter Target to "-23 (EBU)", 2) enable True Peak Limiting and True Peak Metering and 3) set the Output Level to -1 dBTP. To comply with ATSC A/85, do the same but choose a target value of -24 LUFS and an Output Level of -2 dBTP.
- We recommend to combine integrated loudness metering with the Infinite display mode because this allows you to see the loudness curve change over time during the entire length of the incoming audio.
- You might sometimes see LKFS instead of LUFS when reading about loudness and metering. The LKFS unit was originally described for the first ITU-R BS.1770-1 specification. The EBU R128 specification introduced a slightly different implementation, and called it LUFS, which was later copied by ITU and incorporated in the BS.1770-2 standard. Since then, the two are essentially the same and can be interchanged.
Next: Oversampling