FabFilter Pro-L 2 online help
Table of contents
Go to sectionFabFilter Pro-L 2 Help
Introduction
Using FabFilter Pro-L 2
Full Screen mode, resizing and scaling
Presets
Purchasing FabFilter Pro-L 2
Support
Knobs and gain slider
It is easy to control FabFilter Pro-L 2's parameters with the large round knobs. They will light up when you move the mouse cursor around to indicate that you can adjust them. The moment you move the mouse cursor over a knob, a parameter value display will pop up, which shows the name and the current value of the parameter.
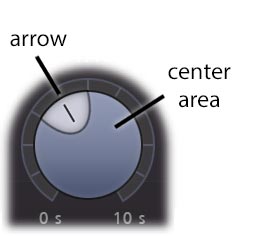
All knobs support four ways of control:
- Vertical mode
Click on the center area of a knob and drag up or down to rotate it. The knob reacts to the speed with which you are dragging, so if you move the mouse slowly, you make precise adjustments. - Rotate mode
Grab the arrow of the knob and drag it around. By moving the mouse cursor further away from the knob while dragging it, you can make precise adjustments. - Mouse wheel mode
Perhaps the easiest way to make adjustments is by using the mouse wheel when you hover over a knob. This mode works for all the knobs and possible panning rings. (On Windows, you might need to click in the plug-in interface first to make sure it is the active window.) - Text entry mode
Double-click a knob to enter an exact value using the keyboard.
Tips
- To reset a knob to its default position, hold down the Ctrl key (Windows) or Command key (macOS) and click the knob once. Note: In Pro Tools, Pro-L 2 uses the default Pro Tools keyboard shortcut for reset: Alt+click.
- To fine-tune a value when using vertical drag mode or the mouse wheel, hold down the Shift key while dragging or moving the mouse wheel. Note: In Pro Tools, Pro-L 2 uses the default Pro Tools keyboard shortcut for fine tune: Ctrl+drag on Windows or Command+drag on macOS.
- There are several handy shortcuts in text entry mode. With frequency values, you can type e.g. '1k' to set the value to 1000 Hz, and also 'A4' for 440 Hz, or even strings like 'C#3+13'. With dB values, you can type e.g. '2x' to get +6 dB (the value that corresponds to two times louder). With all values, you can also type a percentage (e.g. '50%' will put a knob exactly in the middle position).
- Sometimes, knobs in our plug-in interfaces are linked: these can be adjusted simultaneously by holding down the Alt key (Shift key in Pro Tools) while dragging on one of them. For example, an output level and input level setting of a plug-in could be adjusted simultaneously (in the opposite direction) this way.
Gain slider
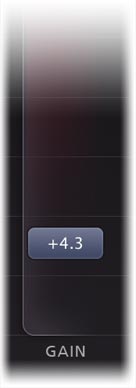 |
The gain slider adjusts the threshold of limiting and the increase in output gain at the same time. Simply put, it makes your audio louder, while respecting the current maximum output level. You can control the gain slider in the following ways:
|
Next: Recommended workflow
See Also
Using on iOS
Overview