FabFilter Pro-L 2 online help
Table of contents
Go to sectionFabFilter Pro-L 2 Help
Introduction
Using FabFilter Pro-L 2
Full Screen mode, resizing and scaling
Presets
Purchasing FabFilter Pro-L 2
Support
Advanced settings
Most of the time, choosing the right preset from FabFilter Pro-L 2's preset menu works very well. But in some cases, you might want to adjust and fine-tune the limiting behavior. To access Pro-L 2's advanced settings, click the Advanced button right under the Gain slider at the left of the interface, which makes the advanced panel slide out. Clicking the button again will hide the panel.
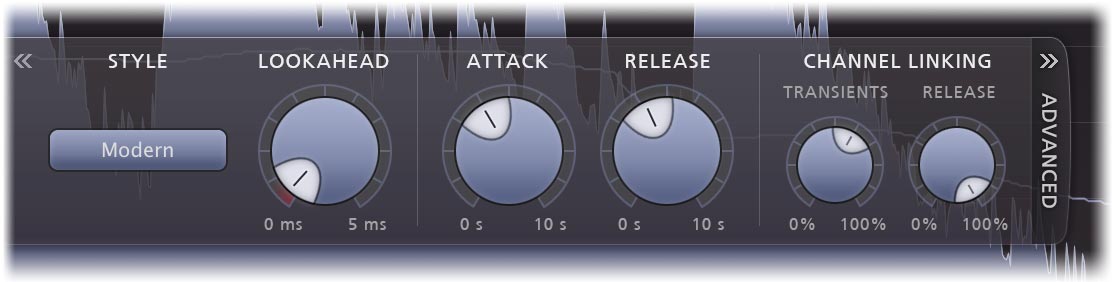
Style
FabFilter Pro-L 2 comes with eight advanced and highly program-dependent limiting algorithms, which all have their own distinct character. One is not better than the other; they are all great, and they all go very loud if you want them to. It is best to select the appropriate algorithm depending on what kind of effect you want to achieve: some are designed to be as transparent as possible, while others may add a nice punch or flavor.
The default Lookahead, Attack and Release values are good starting points but feel free to tweak these to get the best possible results. Here's a short description of all algorithms:
- Transparent: As the name says, this algorithm is designed to stay true to the original sound and feel as much as possible, avoiding pumping effects and coloring. It works great on most program material, but especially on rock and pop music.
- Punchy: Of all algorithms, this one is the most apparent. When pushed, it becomes quite punchy and will introduce a bit of pumping, which can add some nice flavor. Since it's fairly 'safe', minimizing distortion most of the time, it works miracles on single tracks, like vocals, bass or guitar and can give a nice edge to beat-oriented music.
- Dynamic: By enhancing transients before actually applying limiting, this algorithm excels in preserving the original punch and clarity of your audio. It's great on rock music, but it can work surprisingly well on other types of audio as well.
- Allround: This algorithm is designed to work well on almost any program material, striking a good balance between loudness and transparency.
- Aggressive: As the name implies, this algorithm uses an aggressive yet smart, near-clipping style of limiting. This works wonders on EDM/trance music but also shines on rock, metal or pop.
- Modern: As the new default style in Pro-L version 2, the Modern algorithm sets the new standard for all-purpose, transparent limiting. It can achieve very high loudness and allows for very near-zero lookahead settings, while still sounding extremely clean and natural.
- Bus: Especially nice for (drum) bus processing and individual tracks, this algorithm is not meant to be transparent, rather the opposite. Think glue, pump or squash!
- Safe: No distortion ever, that's what this algorithm is designed to achieve. It's perfect for delicate acoustic and/or classical music, or individual instrument tracks.
Note that some algorithms (especially the last four new algorithms introduced in Pro-L version 2) need more latency than others. Do you need to minimize processing latency? Then choose one of the first four algorithms (e.g. Transparent) and disable True Peak Limiting and oversampling.
Lookahead
The Lookahead knob sets the look-ahead time for the initial 'transient' stage. This allows the limiter to examine the incoming audio in advance and predict the amount of gain reduction needed to meet the requested output level. If the look-ahead time is very short, the limiter doesn't have much time to move to the desired level: this will generally have the effect of preserving transients better and increasing the apparent loudness, but at the expense of possible distortion. Longer look-ahead times are safer, but less loud, and transients might appear to get lost in the mix a little more.
Very short look-ahead times (less than 0.1 ms) will approximate 'hard clipping', introducing distortion and aliasing. This causes more inter-sample peaks which can cause further distortion later on. To reduce aliasing and inter-sample peaks, we advise to use oversampling. Also, turn on True Peak Metering to visualize the inter-sample peaks generated, and enable True Peak Limiting to attenuate the remaining true peak overshoot.
Attack and Release
Apart from the fast 'transient' stage, the limiter has a slower 'release' envelope stage that responds to the average dynamics of the incoming audio. The Attack and Release knobs control how quickly and heavily the release stage sets in. Shorter attack times will allow the release stage to set in sooner; longer release times will cause it to have more effect.
In general, short attack times and long release times are safer and cleaner, but they can also cause pumping and reduce clarity. On the other hand, long attack times and short release times can increase apparent loudness and presence, but at the expense of possible distortion.
Channel linking
When limiting a stereo signal, it is generally desirable to process both channels in the same way to avoid changing the stereo image inadvertently. However, when a short peak occurs in one channel, removing it is often almost inaudible. In this case, it is better to remove it only in the channel where it occurs.
You can control this behavior completely with the two channel linking knobs. The Transient knob controls the amount of channel linking for the 'transient' stage that mainly operates on short peaks. It often works well to choose less than 100% here. The Release knob controls the channel linking for the 'release' stage, where it is best to start with 100% which will completely link the channels. However, you can of course experiment with different settings depending on the level of limiting and the character of the incoming audio signal.
When using Pro-L 2 for surround/immersive audio processing, the Channel Linking section will offer more controls, tailored especially to deal with surround channels. See Surround and Dolby Atmos. Of course, in the mono version of the plug-in, the Channel Linking controls are simply disabled.
Tips:
- When you first start to work with FabFilter Pro-L 2, try to use the factory presets. These are great starting points, smartly divided in music categories, and with descriptive names. These might just do the trick already, without even needing to open the Advanced Panel.
- If you have found a preset that you really like, which works well on most music you usually process, you can easily save it as the default preset! Just choose Options > Save As Default from the plug-ins preset menu, and the next time, Pro-L 2 will start up with your favorite settings.
- Using Pro-L 2 for surround/immersive audio processing? See Surround and Dolby Atmos.
Next: True peak limiting
See Also
Overview
Recommended workflow