FabFilter Pro-L 2 online help
Table of contents
Go to sectionFabFilter Pro-L 2 Help
Introduction
Using FabFilter Pro-L 2
Full Screen mode, resizing and scaling
Presets
Purchasing FabFilter Pro-L 2
Support
Input and output options
At the righthand side of the bottom bar in the interface, FabFilter Pro-L 2 has a Bypass button and an Output Level button that opens a panel with a large Output Level knob and various input and output options.
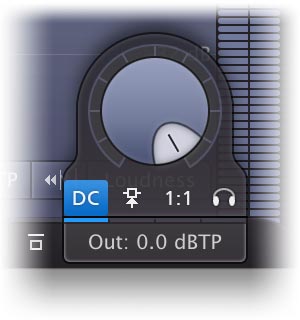
The Output Level knob plays an important role: it sets the desired maximum output level for the limiter. It seems natural to set it to 0.0 dB: you want the output to be as loud as possible, right? Not so fast.
Due to its ultra-fast behavior, the limiting process can generate inter-sample peaks, also known as true peaks: while none of the outgoing sample values are higher than 0 dBFS, the analog wave form that will be constructed out of the samples by the D/A converter can actually exceed this by several dB. Actually, any conversion that reinterprets the wave form, especially AAC/MP3 conversion, can expose inter-sample peaks. This will lead to unpredictable clipping and therefore possibly audible distortion.
"How bad is clipping caused by true peak?"
This is very hard to tell: it depends on many things, such as the quality of the D/A converter or AAC/MP3 conversion process and the character of the music. Many professionally mastered albums contain inter-sample clipping and this doesn't have to be a problem. The main effect is that the music may suffer from slight distortion when played by low-quality D/A converters, or when converted to AAC/MP3 format.
"So what do you recommend?"
We recommend to turn on True Peak Metering to visualize the inter-sample peaks so you are at least aware of them. If the true peaks exceed your desired maximum output ceiling, you can either dial back the Output Level knob to accomodate for the true peak overshoot, or simply enable True Peak Limiting so that true peaks will never exceed the current Output Level (then showing as "dBTP" instead of the normal "dB").
The final Output Level ceiling you choose, depends on the metering standard you need to comply with and/or the medium you are mastering for. Theoretically, you could leave it at 0.0 dBTP with True Peak Limiting enabled, but commonly used metering standards like EBU R128 or ATSC A/85 require a specific maximum dB True Peak level (-1.0 dBTP and -2.0 dBTP respectively), just like popular streaming services as Spotify and Youtube (-1.0 dBTP). When mastering for CD or iTunes, you're safe with -0.1 dBTP. Note that metering standards and requirements tend to change once in a while, so it's always wise to stay updated about the current developments.
Instead of letting the True Peak Limiting process deal with remaining true peaks in the output, it's even better to prevent high true peak overshoot in the first place. There are two ways to accomplish that: turning on oversampling, and slightly increasing the Lookahead setting in the Advanced panel. In most cases, choosing 4x oversampling in combination with a minimum lookahead time of 0.1 ms, keeps the true peaks within a range of 0.1 dB.
Right under the Output Level knob, there are four small option buttons:
- The Filter DC Offset button enables gentle DC offset filtering, which removes a possible DC bias in the input signal. This might have been introduced by earlier asymmetrical wave form processing or saturation. In case the input contains a DC offset, enabling this option avoids unnecessary and asymmetrical limiting of the signal.
- The Side Chain Triggering button routes the external side chain to feed the detection path of the limiting process, instead of the normal input of the plug-in. This can be very useful for stem mastering, when you need to deliver individual stems that have been processed with the exact same limiting as the original master. To achieve this, use Pro-L 2 on the stem channel, while feeding the original (unmastered, unlimited) master to its side chain input.
- Enabling the Unity Gain button automatically sets the Output Level to the inverse of the current Gain, so you can listen to the effect of limiting in relation to the input signal. This makes it much easier to determine the correct limiting settings and target gain, without getting distracted by the increasing loudness which always makes everything appear to sound better. When enabled, a yellow light glows at the top of the button and the output level meters will turn yellow to reflect this state. Note: this mode is meant to be used temporarily only, to help you find the best settings. This means that all metering still shows levels as if the normal Output Level is applied, so you can still see whether you are matching the target loudness you are looking for.
- If enabled, the Audition Limiting option subtracts the processed output from the input audio to audition the 'delta' signal: the actual gain reduction that is being applied. This can give a good indication of when and how much limiting is going on.
You can bypass the entire plug-in with the Global Bypass toggle button to the left of the output level button. While most hosts already provide the ability to bypass plug-ins, our internal global bypass feature is guaranteed to correctly compensate the latency of the plug-in and it also applies soft bypassing to avoid clicks. While the plug-in is bypassed, the display dims and a red light glows at the top of the bypass button itself.
Notes
- When loading presets, enable the Lock Output option next to the presets button to preserve the current gain and output settings. All factory presets were saved with a default output level of 0.0 dB.
- You can directly adjust the output level ceiling by clicking and dragging the output button vertically, so there is no need to click it first to view the output knobs. You can also double-click the output button to directly enter a value using the keyboard.
- The resize button at the right bottom of the interface lets you change the interface size from Compact to Large. See Full Screen mode and resizing.
Next: Surround and Dolby Atmos
See Also
Overview
Recommended
workflow