FabFilter Pro-C 3 online help
Table of contents
Go to sectionFabFilter Pro-C 3 Help
Introduction
Using FabFilter Pro-C 3
Full screen mode, resizing and scaling
Presets
Purchasing FabFilter Pro-C 3
Support
Side chain section
Click the Side Chain button (centered under the main compressor controls) to show or hide the advanced side chain controls.
If any of these advanced features has a non-default setting that affects the sound of the compressor, the button will clearly indicate this with a yellow glow and text. In addition, if you've chosen a non-default trigger input, the appropriate icon will be shown next to the button indicating this. So when you're skipping presets, you can easily see that advanced side chain features are in effect.
- The Side Chain Level slider at the left adjusts the level of the incoming trigger signal. This can for example be useful if the input level is quite soft. Setting a proper input level is easy using the circular side chain level meter.
- The Audition button above the Audition Level slider lets you listen to the filtered and stereo-linked signal that will be used to trigger compression. You can turn Audition mode on or off with a single click, but you can also click-and-hold the button to temporarily audition the trigger signal. Note: audition can only be used when triggering on the internal audio or external side chain.
-
The Side Chain Input selector chooses what the compressor triggers on. By default (Internal), it triggers on the main input audio of the plug-in, but you can also select External to trigger on the external side chain input. For more information on connecting the external side chain in various hosts, see External side chaining.
New in Pro-C 3 is the Host Sync option, which makes compression trigger on a generated pulse, synched to host tempo. When you select this, a panel with additional settings appears: the Sync button sets the speed (relative to the song tempo) at which the pulse is generated. With the Offset slider, you can adjust the sync speed with a factor between 50% and 200%, which makes it possible to achieve dotted or triplet effects. The Length slider sets the length of the pulse, as a percentage of the current sync setting.
Finally, you can trigger on incoming MIDI note on messages, so you can create custom trigger patterns in your DAW. If at least one note is on, the compressor behaves as if a 0 dBFS signal is entering the side chain at this moment, so it is strongly triggered. See MIDI Learn on how to route MIDI to an effect plug-in in your DAW.
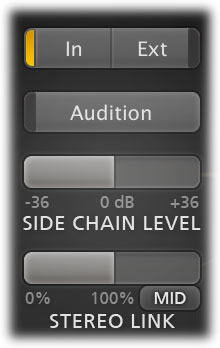
Stereo linking and M/S processing
The first half of the Stereo Link knob sets stereo linking from 0% (fully unlinked, channels operate independently) up to 100% (fully linked, resulting in the same gain reduction for both channels).
By turning the knob beyond 100%, Pro-C 3 will eventually process only the mid-signal (mono
content of the processed audio), or only the side-signal (stereo content of the processed
audio). (If you'd like to learn more about mid/side processing and its various
uses, see our Mid
Side Demystified  video tutorial by Dan Worrall.)
Using the small Stereo Link Mode button at the right bottom of the Stereo Link knob, you can choose between four options. With the knob at its maximum position, this will be the result:
- Mid - Only trigger on, and apply compression to, the mid signal.
- Side - Only trigger on, and apply compression to, the side signal.
- M>S - Trigger on the mid signal but only apply compression to the side signal.
- S>M - Trigger on the side signal but only apply compression to the mid signal.
M/S processing can be very useful, especially during mastering. For example, bass or lead vocals are often placed in the center of the stereo image, so only processing the mid-signal will leave all stereo content untouched, ensuring the most transparent end result possible.
To better understand the working of these settings, enable the Audition button. You can now directly hear the effect of stereo linking and mid-only or side-only processing!
When using Pro-C 3 for surround/immersive audio processing, the Stereo Linking section will offer slighly different controls, tailored especially to deal with surround channels. See Surround and Dolby Atmos. Of course, in the mono version of the plug-in, the Stereo Linking controls are simply disabled.
Side chain EQ controller
The large interactive EQ controller takes up most of the side chain section, and enables you to easily adjust the side chain filtering. You can freely add up to six EQ bands, with all the shapes you already know from Pro-Q, including All Pass filters. The low- and high pass filters support slopes up to 96 dB/oct and also the Brickwall slope.
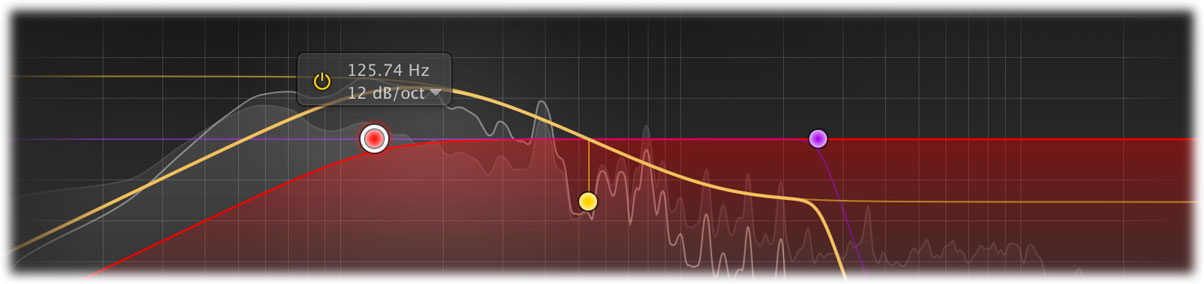
Creating bands
- To add a new EQ band, simply click on the yellow overall curve and drag it up or down. You will see a small preview of the type of curve that will be created when you start dragging.
- Alternatively, double-click anywhere in the display background to add a new band. The shape of the newly created band depends on where you create it.
Selecting bands
- Click the EQ band's dot or the colored area around it to select it.
- Click and drag on the display background to select adjacent bands by dragging a rectangle around them.
- Hold down Ctrl (Command on macOS) and click another dot to select multiple bands. Hold down Shift and click a dot to select a consecutive range of bands.
- Deselect all bands by clicking anywhere on the display background.
Adjusting and editing bands
Once you have selected one or more EQ bands, the display highlights the shapes of the selected bands. To edit the EQ settings:
- Click and drag a selected dot to adjust the frequency and gain of all selected bands. If you have multiple bands selected, the gain of all selected bands will be scaled relative to each other.
- Move the mouse wheel to adjust the Q setting, making the selected bands narrower or wider. This works while dragging or when the mouse pointer is above a curve. For low/high cut filters, the mouse wheel adjusts the slope instead, setting it to stepped values.
- Alternatively, adjust the Q of all selected bands by holding down Ctrl (Command on macOS) while dragging vertically.
- Move the mouse wheel while holding down Alt to adjust the dynamic range setting or Ctrl (Command on macOS) to adjust the gain.
- Hold down Shift while dragging (or while using the mouse wheel) to fine-tune the settings of the selected bands.
- Hold down Alt while dragging to constrain to horizontal adjustments (frequency) or vertical adjustments (gain or Q, depending on the Ctrl/Command key).
- Hold down Alt and click the dot on an EQ band once to toggle its bypass state (enabling or disabling the band).
- Hold down Ctrl+Alt (Command+Alt on macOS) and click the dot on an EQ band once to change its shape.
- Hold down Alt+Shift and click the dot on an EQ band once to change its slope.
- Double-click a dot to enter values in the EQ parameter display (using the Tab key to step through Frequency, Gain and Q) or double-click the values in the parameter value display directly. Note that you can enter frequencies in various ways, like "100", "2k", "A4" or "C#2+13".
- If you right-click on the dot for an EQ band, a pop-up menu appears with various band settings. This is a quick way to modify the EQ band while you're working in the display.
- You can choose a stereo placement for a band (stereo, mid or side) or specify which speakers it affects (only in surround mode) from the band menu, which you can open by either right-clicking a band's dot in the display, or clicking the menu button in the parameter value display of a band.
Copying and pasting bands
You can copy any band or selection of bands by right-clicking on a curve dot, and choosing Copy from the curve menu. Now, you can paste these band in any Pro-C 3 instance by right-clicking anywhere in the side chain controller, and choosing Paste from the menu that appears. To copy all bands, right-click on the background and click Copy from this menu.
To copy and paste all Pro-C parameters, use the Copy and Paste commands in the preset browser.
EQ parameter display
Next to each EQ band's dot in the side chain controller, the EQ parameter display shows the exact parameter values for the EQ band, along with quick controls to bypass or delete a band and change its shape. You can double-click a value in the display directly to edit it. You can also click-and-drag or use the mouse wheel above any of the shown parameters to make changes on a band or selection. Click the triangular menu button to access the band menu with more options.
Tips
- To learn more, read the Side chain compression article in our online FabFilter Learn tutorials.
- In Full Screen mode, available via the button at the right top of the interface, Pro-C 3 will fill the whole screen, making the side chain EQ controller much larger as well, so you can make very precise adjustements. See Full Screen mode and resizing.
- When using MIDI triggering, make sure that you have the Disable/Enable MIDI option in the MIDI Learn menu turned on.
- The spectrum analyzer of the side chain EQ controller uses a 4.5 dB/oct tilt setting. This results in a natural looking spectrum, resembling best how loudness is perceived by the human ear.
Next: Displays and metering
See Also
Using FabFilter Pro-C 3
Dynamics controls
Time controls