FabFilter Pro-C 3 online help
Table of contents
Go to sectionFabFilter Pro-C 3 Help
Introduction
Using FabFilter Pro-C 3
Full screen mode, resizing and scaling
Presets
Purchasing FabFilter Pro-C 3
Support
Style and character
Most compressors have the same set of classic controls, like Threshold, Ratio, Attack and Release. Yet they can sound very different, even when trying to match settings. This is because internally, all compressors work differently, using different detection algorithms, different topologies and different smoothing curves. And especially in analog/hardware compressors, there can be more factors that contribute to the sound, like transformers or tubes.
With Pro-C 3's Style and Character options, you can combine a variety of compressor styles with different types of analog coloring. So you don't just get one compressor, you get many!
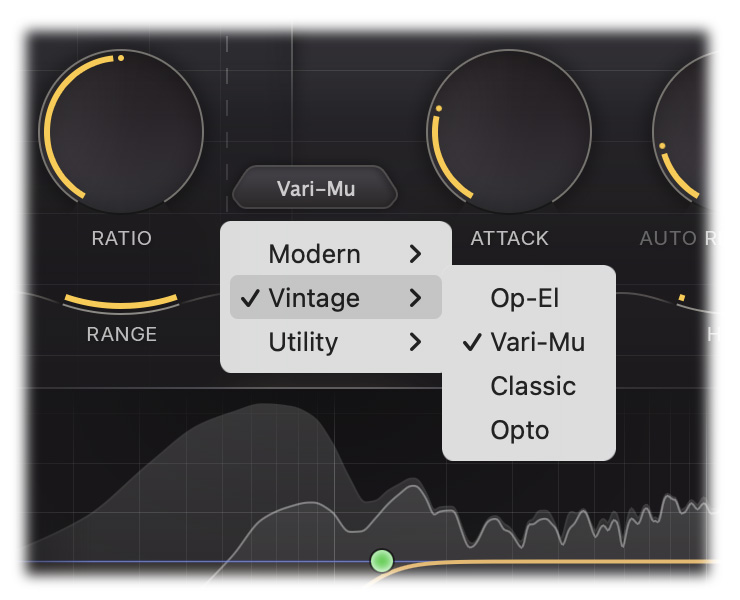
The Style button selects the style or compression. Pro-C 3 offers 14 different styles, all with their own characteristics, divided into three categories.
Modern:
- Clean - An allround, low distortion, feedforward, program dependent style
- Versatile - As the name implies, works great on any material. It's punchy at longer attack times but tight and smooth at shorter times (new in Pro-C 3)
- Smooth - Designed to stay smooth at all times, especially suitable for gluing with low ratio and longer times (new in Pro-C 3)
- Punch - Traditional, analog-like compression behavior, sounds good on anything!
- Upward - Pumping, upward compression (increasing the level when it drops below the threshold), like Saturn's much praised Dynamics knob, but with more control over its behavior (new in Pro-C 3)
- TTM - To The Max multiband mayhem. The TTM style combines upwards and downwards compression on multiple bands, making the input signal louder when it's quiet and quieter when it's loud. In this style the threshold effectively becomes a target level. The knee then controls the blending between the two stages, allowing you to further shape the pumping behavior (new in Pro-C 3)
Classic:
- Op-El - Effortless opto-like tube compression, smooth and warm (new in Pro-C 3)
- Vari-Mu - A classic variable mu topology, offering smooth and colorful feedback compression (new in Pro-C 3)
- Classic - A vintage, feedback, very program dependent style
- Opto - A relatively slow, very soft knee, more linear opto style
Utility:
- Vocal - A very effective algorithm to bring vocals to the front of your mix. It works with automatic knee and ratio settings, so compressing your lead vocal is as easy as choosing the right threshold
- Mastering - Designed to be as transparent as possible, introducing as little harmonic distortion as possible, while still being able to catch those fast transients
- Bus - Especially great for bus processing, or for adding a pleasant glue to your drums, mixes or tracks
- Pumping - Deep and over-the-top pumping, great for drum processing or EDM
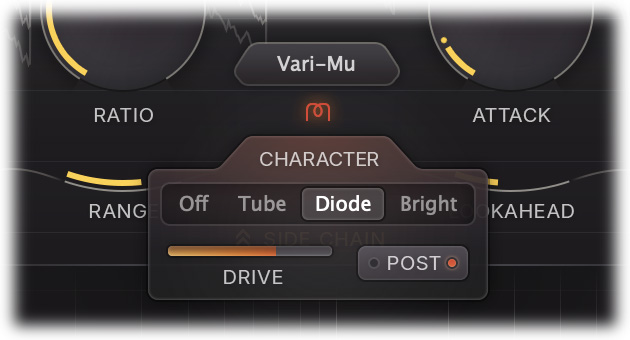
The Character button right below the Style button opens the Character panel with the following settings:
- Character mode sets the type of analog saturation, color and drift. You can choose between Off (disabled), Tube, Diode and Bright. All three options have their own character and introduce different harmonics and coloring. Try them!
- Drive sets the level at which the saturation circuit is driven internally which affects the amount of saturation and harmonics.
- Routing determines whether saturation takes place before (Pre) or after compression is applied (Post). By default, it's set to Post, which will nicely saturate transients that remain when applying compression with higher attack values. When set to Pre, the signal and peaks in the input will be saturated before compression, which results in a wholly different character.
Some notes about Vari-Mu and TTM
Two of the above styles are quite different from the rest, and it really helps to understand why they are different and how to work with them.
The Vari-Mu style is a feedback algorithm (just like the Classic style). This means that detection happens on the output of the compressor instead of on the input. In practice, this mainly results in quite different attack and release behavior, e.g. attack typically reacts very fast, but smooths as soon as target compression levels are reached.
But that's not the only thing that makes the Vari-Mu style different. The biggest difference comes from the fact that it uses vacuum tubes (i.e. remote cutoff tubes) to apply compression, instead of adjusting the output gain value based on a ratio-scaled difference with the threshold. A result of this topology, is that the effective ratio will vary depending on the input level, a sort of built-in soft knee character.
Due to this, the Ratio knob may feel quite different. Instead of scaling the detected difference, with Vari-Mu it determines the amount to drive the remote cutoff tubes with; the soft transfer curve characteristic of the tube then determines the amount of compression. This does not map one-to-one to regular ratio behavior, especially since this depends on the level of the input signal.
If you don't drive the Vari-mu algorithm hard enough, little will happen or you will need to use a much higher Ratio. Actually, the sweet spot for input level of the Vari-Mu algorithm is the -12 to +3 dBFS range. Also note that when driven very hard, the tubes will simply clip, meaning that there is a maximum amount of compression that can be achieved, which is typically lower than with normal compression. Tip: try to use the Auto Threshold feature!
All in all, the Vari-Mu algorithm is beautifully program dependent and very characterful, but you may need to get used to working with it. And just keep in mind that when changing compressor styles in Pro-C 3, you might need to tweak some settings, especially with the Vari-Mu algorithm.
The TTM style is probably the most different of all. This algorithm combines upward and downward compression on three seperate bands (with crossovers at roughly 90 Hz and 2.5 kHz). Because of this, the controls respond differently than one might expect, as they affect each band in their own way.
As the knee display suggests, the threshold for the downward compression stages is simply set to the current, main threshold level. However, the threshold for the upward compression stages lies at a band-specific setting below the main threshold. So for the TTM style, the threshold knob allows you to change the relationship between the upwards and downwards stages, where higher values mean more upwards compression and lower values mean more downwards compression. It might seem like this would have relatively little impact when you match output volumes, but due to the differences in range and ratio between the stages it can significantly affect the sound.
The threshold can also be easily shaped using the Side Chain EQ section, which has much more drastic consequences for your sound because the multiple bands work independently. Unlike with the other styles, the Side Chain EQ will also have an audible effect on the loudness of the different bands.
Tips
- You can also use the mouse wheel when hovering above the Character button to toggle between the different character modes.
- The Character Drive slider is reverse-linked with the Threshold knob. This makes it easy to 'trade' compression for saturation in one movement.
Next: Side chain section
See Also
Dynamics controls
Using FabFilter Pro-C 3