FabFilter Pro-DS online help
Table of contents
Go to sectionFabFilter Pro-DS Help
Introduction
Using FabFilter Pro-DS
Full Screen mode, resizing and scaling
Presets
Purchasing FabFilter Pro-DS
Support
Advanced controls
After you have set up the basic working of the de-esser using the basic controls, you can tune the sound even more using Pro-DS's advanced features.
Processing
Using the processing buttons, you can choose between Full Band processing and Split Band processing. When Full Band processing is enabled, Pro-DS will lower the overall gain of the audio when sibilance is detected. When Split Band is chosen, only high frequencies will be attenuated. The split frequency is determined automatically according to the chosen high-pass sidechain filtering setting.
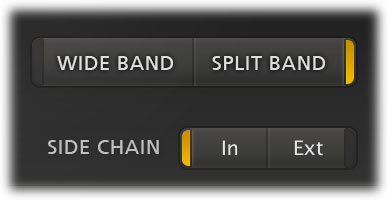
When working with single vocals, the Wide Band option often gives you great results already, but when de-essing full mixes, or more complex audio, it's often best to use the Split Band mode and leave the lower frequencies untouched. In some cases however, especially with single vocal material, Wide Band sounds more natural. Note also that split-band processing introduces some additional latency (see Lookahead below).
Split-band processing (in combination with the Allround mode) is also often used during mastering, where the de-esser functions as a high frequency limiter. The basic trick is to compress transients in the high frequencies of the music, and bring up that same frequency range again afterwards using a high shelving filter (using FabFilter Pro-Q for example). This can really brighten up the music, and glue the overall sound, giving it a nice edge!
Sidechain input signal
At the bottom center of the interface, you can choose whether you would like to use the normal input signal or the exteral side-chain input signal for triggering. Using an external side-chain signal can be very useful. For example, when de-essing heavily processed/distorted vocals, you could use the original 'clean' vocal track as a side-chain input, resulting in better detection results.
Stereo linking and mid-only / side-only processing
Using the single Stereo Link knob and its Stereo Link Mode button (only available in the stereo version of the plug-in of course), you can both set a variable stereo linking for the trigger input signal, and choose between normal stereo or mid-only/side-only processing.
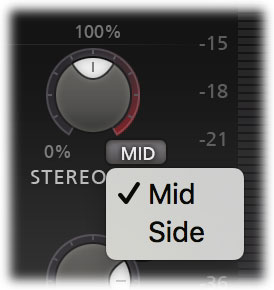
The first half of the knob's range sets stereo linking from 0% (fully unlinked, channels operate independently) up to 100% (fully linked, resulting in the same gain reduction for both channels).
When turning the knob even further, you will eventually process only the mid-signal (mono content of the processed audio), or only the side-signal (stereo content of the processed audio). Using the small Stereo Link Mode button at the right bottom of the Stereo Link knob, you can toggle between the two.
Mid- or side-only processing can be very useful, for example while mastering. A lead vocal is often placed in the center of the stereo image, so only de-essing the mid-signal will leave all stereo content untouched, ensuring the most transparent end result possible. Alternatively, when de-essing backing vocals in a stereo mix (often panned left or right), you could choose side-only de-essing, ensuring that Pro-DS leaves all mono content untouced, like the lead vocal.
To better understand the working of these settings, enable the Audition Sidechain button right under the side-chain filtering sliders. You can now directly hear the effect of stereo linking and mid-only or side-only processing!
Lookahead
With the Lookahead knob, Pro-DS can be set to start de-essing up to 15 ms before the trigger audio level actually exceeds the threshold. This is an excellent way to catch transients and/or the start of sibilance.
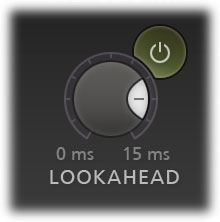
Often, when de-essing vocals, a lookahead value of about 10 ms is optimal to ensure you're catching all of the sibilance. Leaving a bit of the initial transient untouched might help to preserve a 'natural' s-sound, so take your time to experiment and choose an appropriate value for the audio you're processing.
You can enable or disable look-ahead with the Lookahead Enabled button, just at the right-top of the Lookahead knob. When look-ahead is disabled, processing is set to Wide Band and oversampling is off, Pro-DS works without any latency. When look-ahead is enabled, the latency will be 15 ms, plus a small additional latency if oversampling or split-band processing is used.
Tips
- When choosing a look-ahead value, it might be handy to enabled the Audition Triggering mode, using the round button at the left top of the Threshold knob. This way, you can hear right away whether you're catching all of the detected sibilance.
Next: Metering
See Also
Basic controls
Overview