FabFilter Pro-R 2 online help
Table of contents
Go to sectionFabFilter Pro-R 2 Help
Introduction
Using FabFilter Pro-R 2
Full Screen mode, resizing and scaling
Presets
Purchasing FabFilter Pro-R 2
Support
Loading presets
FabFilter Pro-R 2 comes with a selection of excellent factory presets, conveniently ordered in folders based on room size. They are great starting points and will give you a good impression of what FabFilter Pro-R 2 is capable of.

The preset button shows the name of the current preset. If you have changed the preset by adjusting one or more parameters, the name is dimmed to indicate that this is not the original preset anymore.
Click the preset button to open the preset browser:
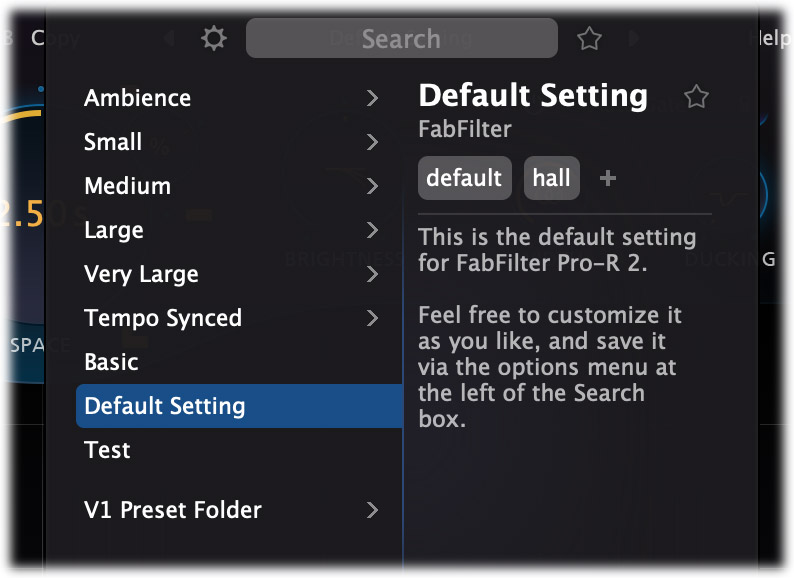
The preset browser shows all presets grouped in folders, with the current preset highlighted in blue.
Preset details
A preset can contain extra information: author, tags and a description, which is shown in the panel on the right. These fields are present in all factory presets and can of course be edited as well: just double click the author or description. To add a tag, click the + button. Double-click a tag to rename it, or hover over the tag and click the x button to remove it.
Browsing presets
You can browse and select presets in various ways:
- Of course, you can simply browse using the mouse. Hover over folders to open them, and click on a preset to load it. If you move the mouse outside the browser after selecting a preset, the browser will close. Otherwise, it will stay open so you can look around and try multiple presets, or edit their information.
- Within the preset browser, you can use the arrow keys to navigate, and the Enter key to load a preset and close the browser. Use the right arrow key to load a preset without closing the browser. Press the Esc key to close the browser without selecting anything.
- You can also click the previous/next arrow buttons around the preset button to explore presets one by one without opening the preset browser.
- ... and while the browser is open, use the [ and ] keys to load the next or previous preset directly.
Searching, filtering and favorites
In the preset browser, you can start typing to search through the presets, filtering on folder name, preset name or tag. While typing, the preset browser automatically filter the current selection and update itself to show the resulting sub set. If you've first started browsing by mouse, just click the Search field and type to start filtering again.
You can also mark presets as favorite, by clicking the star icon next to the preset name in the preset details panel. Click the star icon next to the Search field to show only your favorites.
Preset browser options
Click the Options button  at the left of the search field at
the top to open a menu with extra options:
at the left of the search field at
the top to open a menu with extra options:
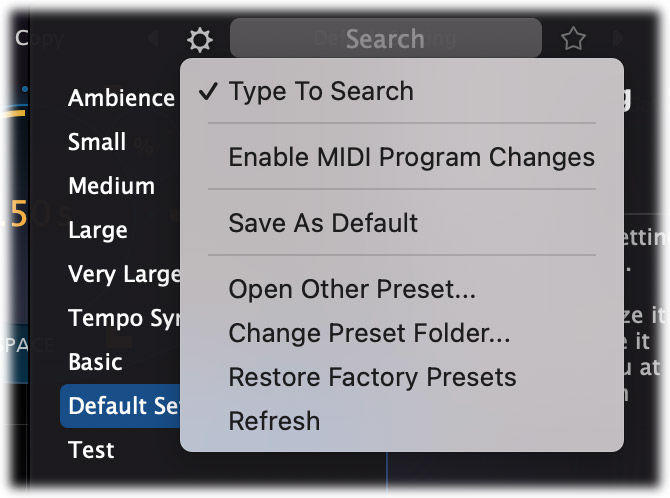
- When Type To Search is enabled, you can start typing to search, right after you've clicked the preset button. Disabling this will always require a click in the Search field to start searching. This might be handy, for example if you're working without a MIDI keyboard and use letters on your computer keyboard to play notes.
-
When Enable MIDI Program Changes is active, you can load presets via MIDI program change
and bank select messages. The corresponding bank/program numbers are then shown in front of
the preset name (for example: (0/65) My Preset). This means that you can load that
preset by first sending a Bank Select message to select bank 0 and then sending a Program Change
message to select program 65.
Important: All the presets in your preset folder are numbered automatically, starting with bank 0 and program 0. This way, you are able to access any of the presets via MIDI. However, this also means that when you add new presets to the menu, bank/program numbers of other presets might change. Be aware of this when recording program changes in a session! We recommend to create a dedicated folder in your presets folder for your program changes, and name it with two leading underscores (e.g. "__Programs") to ensure it's the first folder in your preset collection and the presets in this folder start with bank 0 and program 0. - The Default Setting preset is loaded automatically when FabFilter Pro-R 2 is started. To change the default settings, simply overwrite this preset by clicking Save As Default.
- To open a preset outside the presets folder, click Open Other Preset. This might be useful if someone sends you a preset by email, for example.
- To change the location where the presets for Pro-R 2 are stored, choose Change Preset Folder and select the desired folder.
- If somehow the factory presets are lost or not installed properly, click Restore Factory Presets to restore them.
- If needed, for example after you've manually removed or added files in the folder while Pro-R 2 is open, click Refresh to rescan the preset folder.
Compatibility with Pro-R 1
All presets created with Pro-R 1 can be loaded in Pro-R 2. If Pro-R 1 is also installed on your computer, your Pro-R 1 presets will be accessible via the V1 Preset Folder submenu in the preset menu. The factory presets for Pro-R 1 are also included in the Pro-R 2 factory presets, so you only need to use the V1 Preset Folder submenu to access presets you might have created yourself.
You can read more about compatibility between Pro-R 1 and 2 in Upgrading to Pro-R 2. Please take some time to read it if you are planning to replace Pro-R 1 instances with Pro-R 2 instances in your songs.
Next: Saving presets
See Also
Impulse Response import
Using on iOS
Overview