FabFilter Pro-R 2 online help
Table of contents
Go to sectionFabFilter Pro-R 2 Help
Introduction
Using FabFilter Pro-R 2
Full Screen mode, resizing and scaling
Presets
Purchasing FabFilter Pro-R 2
Support
Main controls
FabFilter Pro-R 2 offers a row of intuitive main controls to control the behavior of the reverb algorithm:
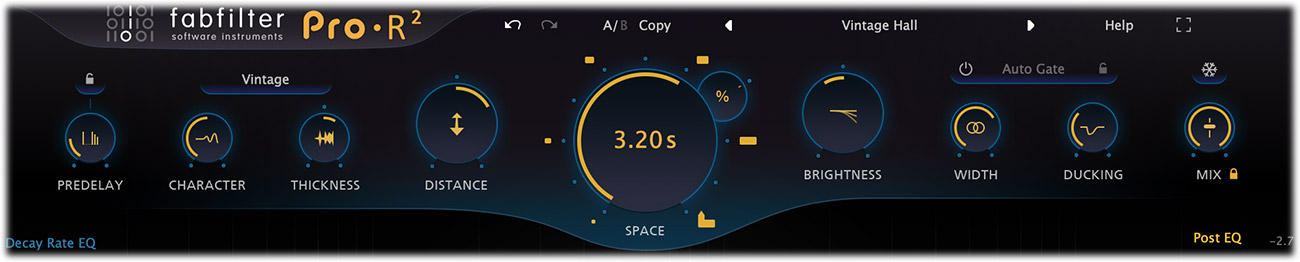
- Prominent at the center, the Space knob is obviously the most important control of Pro-R 2. It smartly and smoothly combines the room model and decay time of the reverb, ranging from a very small ambience space (200 ms) to a cathedral-like ten-second reverb. With this single control, you can choose from over a dozen carefully designed room models and seamlessly vary between them, without hearing clicks or unwanted artifacts. The decay time varies automatically to match the room model. The yellow time label in the Space knob shows the current reverb decay time (possibly affected by the Decay Rate setting). Tip: As a shortcut, you can directly click the room icons around the Space knob.
- The Decay Rate control lets you adjust the reverb decay from 25% to 400% of the decay that corresponds to the current Space setting. This allows you to easily fine-tune a room model to have the decay that it needs in the mix. The yellow time label in the Space knob will always display the final reverb decay time, together with the original time and decay rate if not at 100%.
- The Style button above Character and Brightness selects one of the three available reverb styles:
- Modern: This is the original Pro-R version 1 style, which is the best style to create very natural, realistic sounding spaces.
- Vintage: Based on the sound and character of the early digital reverbs. It excels in the large spaces and longer decay times, bringing lots of character and beautiful shimmer.
- Plate: Replicates the sound of vintage plate reverbs, with quite a fast build up and a pleasant metallic vibe to it.
- The Predelay knob controls the initial delay between the original sound and the start of the reverb. Adding a bit of predelay increases the separation between the original sound and its reverb tail. For example, moving the reverb tail away from a vocal can highly improve the clarity and transparency of a mix. Predelay also contributes to the sense of space. Higher predelay settings tend to increase the perceived room size. Increasing predelay instead of the overall decay time can work well in achieving a less intrusive, more natural reverb that sits better in a mix.
- The Predelay Sync button at the top of the knob lets you easily synchronize the predelay time to host tempo. By default, synching is off and the normal delay time is used. Other options are: Quarter Note, 8th Note, 16th Note and 32th Note. The Predelay Offset knob replaces the normal Predelay time knob as soon as Predelay Sync is enabled. The offset knob lets you scale the predelay from 50% to 200% of the synchronized time. This way, you can easily achieve dotted (150%) or triplet (67%) effects.
- The Character control brings life to the reverb sound in various ways. At 0%, the reverb is as transparent and predictable as possible. Turning the knob up to 50% gradually introduces some modulation and more pronounced early reflections together with subtle yet noticeable late echoes. From 50% and up, the reverb begins modulating more and more, up to a chorus-like effect at 100% which works well on vocals and synths.
- The Thickness control applies an intuitive combination of density and saturation. Turning it up will make the reverb more dense, but will also introduce subtle non-linearities and dynamics to the sound. Turning it down will result in a more airy, sparse reverb. Note: The audible effect can vary quite a lot depending on the program material.
- The Distance knob controls the effect of moving closer to, or further away from the sound source in the modelled space. At 0%, the reverb sounds as if you are quite close to the sound source, with more pronounced and brighter early reflections. Increasing the Distance sounds like walking away from the sound source in the current space, resulting in a longer build-up and a more diffuse tail.
- The Brightness knob adjusts the clarity and high/low frequency balance of the reverb. Lower Brightness values correspond to spaces with more high-frequency absorption. In real spaces, high frequencies are very easily absorbed, depending on the surface of walls and curtains or objects in the room. The average room or hall has a pretty dark reverb sound. Therefore, turning down the Brightness a bit often gives you a more natural and realistic sounding reverb.
- The Stereo Width knob adjusts the apparent width of the reverb sound. It does not just mix the output signal to mono, but also controls internal stereo linking and channel cross-feeding. Starting at 0% (mono), increasing the stereo width slowly makes the reverb true stereo. At 50%, channel cross-feeding is at its maximum: a sound that originates in one input channel, reverberates with an equal amount in both channels. Increasing the value from 50% up, slowly re-introduces stereo placement, up to a 100% where channels operate completely independent (i.e. multi-mono). Above 100%, the side signal is amplified which can be useful to achieve better mono compatibility.
- The Ducking knobs sets the range of the integrated, intelligent ducking feature. It's a fast and easy way to get better separation between wet and dry signals, especially for vocals. Ducking triggers on the input signal of the plug-in.
- The Auto Gate button enables and controls the automatic gating feature. Click the enable button at the left to turn auto-gating on or off. Drag vertically on the button to set the hold time, or click the sync button on the right to choose a time depending on host tempo, just like with Predelay. The auto gate triggers on the input signal of the plug-in and the intelligent algorithm has automatic threshold and attack/release settings, tuned to work perfectly when applied to separate drum sounds. Be creative and do try auto gate on other program material as well. The results can be surprisingly good!
- The Freeze button above the Mix knob will bring the reverb in a state of 'eternal' decay, reusing only the existing contents of the 'reverb tank' until you disable Freeze mode again. Some controls, like Distance and Thickness, won't affect the sound anymore since they are mainly applied to the input of the reverb. Others, like Character, Brightness, Ducking and Auto Gate, can still be adjusted. If you click and hold the Freeze button, the reverb is frozen only while you're holding the mouse down.
- The Mix knob controls the dry/wet balance of the final reverb sound. If you are using Pro-R 2 as a send effect, you should set it to 100%.
- The small Lock Mix button underneath the Mix knob locks the mix setting to its current value while loading presets, so you can more easily compare different settings. When locked, you can still manually change the mix or automate it if desired, and the mix value is always saved with your session. If you change the Lock Mix setting, new Pro-R 2 instances will automatically pick up the new setting.
Next: Decay Rate EQ