FabFilter Pro-Q 4 online help
Table of contents
Go to sectionFabFilter Pro-Q 4 Help
Introduction
Using FabFilter Pro-Q 4
Full Screen mode, resizing and scaling
Presets
Purchasing FabFilter Pro-Q 4
Support
Band controls
When you select EQ bands in the interactive EQ display, the floating band controls will automatically appear, right under the selected bands at the bottom of the display. The band controls show the current settings of the selected EQ bands and enable you to adjust them precisely.
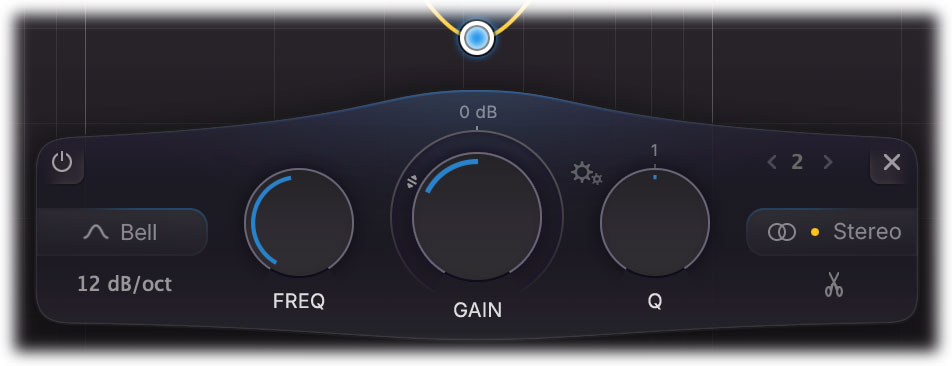
From left to right, the following settings are available:
- The bypass button at the left top lets you easily bypass the selected EQ bands. Note that you can also bypass an EQ band by Alt-clicking its dot in the display. While an EQ band is bypassed, it is dimmed in the display and a red light glows in the bypass button.
- The shape button selects the filter shape of the selected bands:
- Bell, the traditional parametric EQ shape and probably the most versatile of them all
- Low Shelf, to boost or attenuate low frequencies
- Low Cut, to cut all sound below the filter frequency
- High Shelf, to boost or attenuate high frequencies
- High Cut, to cut all sound above the filter frequency
- Notch, to cut a small section of the spectrum
- Band Pass, to isolate a section of the spectrum
- Tilt Shelf, to tilt the spectrum around a certain frequency
- Flat Tilt, to tilt the spectrum using a flat curve, around a certain frequency
- All Pass, to introduce phase adjustments without changing the gain
- The slope button below the shape parameter sets the steepness of the filter for any curve shape, from 0 dB/oct to 96 dB/oct (and even up to Brickwall for Low Cut and High Cut filters), and can be set to any fractional slope value in between. Clicking the button opens a menu that lets you either click the desired slope, or drag the indicator to choose any in-between value. You can also use the mouse-wheel above the button, which will change the slope between the traditional, fixed slope settings, or hold the Shift key (or in Pro Tools: Ctrl+drag on Windows or Command+drag on macOS) to set any fractional slope.
- The frequency knob sets the frequency of the selected band between 10 Hz and 30 kHz. If multiple bands are selected, they are adjusted in parallel.
- The gain knob sets the gain in dB of the selected bands between -30 and +30 dB. This setting is only used for Bell, Shelving and Flat Tilt filter types.
- The dynamic range ring sets the range of dynamic EQing in dB, ranging from -30 to 30 dB (possibly limited by the gain setting limits). Choosing a positive or negative dynamic range will make the band dynamic and expose additional dynamic controls. This setting is only available for Bell and Shelving filter types. See Dynamic EQ.
-
The Q knob sets the bandwidth of the selected bands, widening or narrowing them. The Q cannot be adjusted when a 6 dB/octave slope is used.
Note: Because there are different interpretations of Q values in various EQ plug-ins and scientific papers, we have chosen the value 1 to correspond to the default bandwidth. For the shelf filters, the internal Q values are chosen such that they result in a good range of shelf shapes. Keep this in mind when trying to reproduce the filter shapes of another EQ plug-in in Pro-Q: the interpretation of the Q values might not be the same.
-
Using the Gain-Q interaction button, between the gain and Q knobs, you can enable a subtle, analog-EQ-like gain-Q interaction. When enabled, Q and gain influence each other in a pleasant way often found in analog mixing consoles. Essentially, this means that the Q automatically gets a bit narrower when gain is increased, and the other way around, a little gain is added when the Q gets very narrow.
Note: Gain-Q interaction only affects the Bell filter shape. Pro-Q remembers the last Gain-Q interaction setting that you've chosen and will use this for new instances of the plug-in.
-
The previous- and next band buttons let you step through the current available bands in the display, in the order in which they currently appear in the display. In between, the band number of the current band is shown to help you to identify this band in the host when automating EQ parameters.
Note: When creating new bands, they will be numbered 1, 2, 3 and so on. But when you delete a band, the others won't renumber, in order to ensure that currently written automation in your host still controls the correct band.
- The delete button at the right top removes the selected EQ bands. If you have accidentally deleted some bands, you can easily restore them using the Undo button at the top of the plug-in interface.
- The stereo placement button controls which channels are affected by the selected bands. The split button (scissors icon) splits the selected bands into L and R (or M and S) bands. See Stereo options. When using Pro-Q on a surround/immersive audio channel, the stereo placement button will open a panel with more extensive stereo placement and speaker selection setting. See Surround and Dolby Atmos.
Tips
- Double-click any knob to enter the value directly using the keyboard. See Knobs for more information. For the Frequency knob, you can enter values in various ways, like "100" or "2k", but also "A4" or "C#2+13".
- To hide the band controls, simply deselect all bands by clicking on the display background.
- Hold down the Alt key while changing the gain or dynamic range knobs in a reverse-linked way (i.e. to trade gain for dynamic range).
- The minimum possible slope value is different for the various filter shapes. Bell and Notch filters have minimum slope of 12 dB/oct, Low Cut, High Cut and Band Pass filters go all the way down to 0 dB/oct, while all other slopes use 6 dB/oct as the minimum possible value.
- The All Pass shape is useful for adjusting the phase relationship between related tracks in a mix. You could see it as a versatile alternative to simply inverting the phase.
Next: Dynamic EQ
See Also
Overview
Display and workflow