FabFilter Pro-Q 4 online help
Table of contents
Go to sectionFabFilter Pro-Q 4 Help
Introduction
Using FabFilter Pro-Q 4
Full Screen mode, resizing and scaling
Presets
Purchasing FabFilter Pro-Q 4
Support
Display and workflow
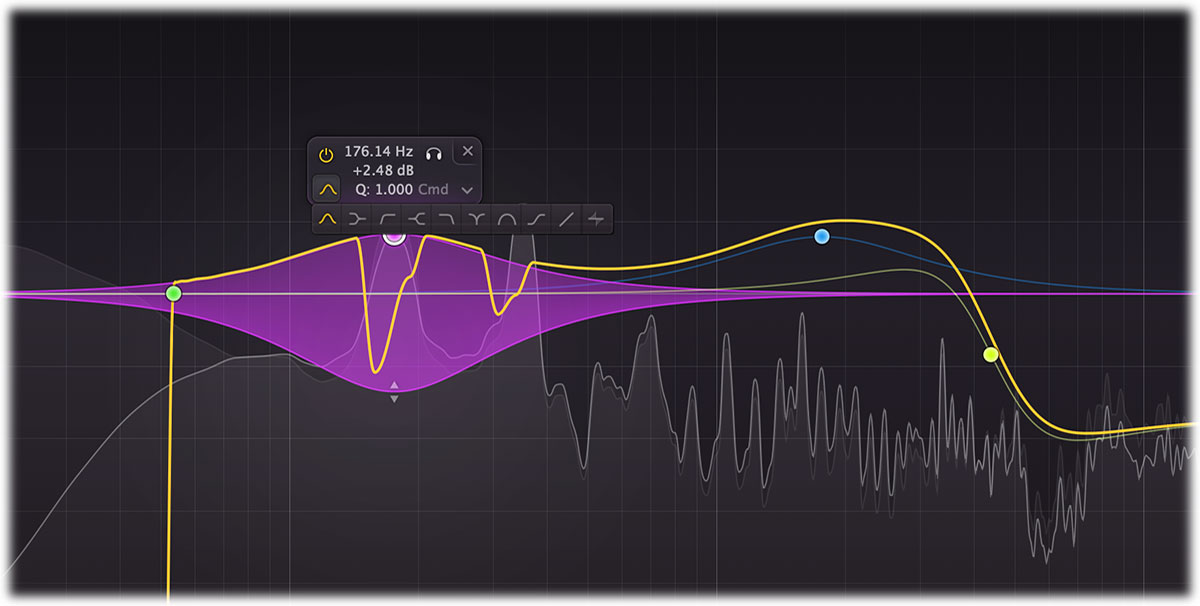
The large display shows all EQ bands and lets you easily create new bands and edit them. The thick yellow curve shows the overall frequency response and dynamic behavior of the equalizer. The EQ display looks simple and straightforward, but it contains a lot of intelligence and smart features. We strongly recommend to take some time to read this topic and learn about all its options and shortcuts... it will highly improve your workflow!
Creating bands
- To add a new EQ band, simply click on the yellow overall curve and drag it up or down. You will see a small preview of the type of curve that will be created when you start dragging.
- Alternatively, when you hover anywhere in the display, a subtle curve preview will appear, indicating the exact curve that you can create at that position. Just click (or double-click) on the display background to add it.
- When you already have bands selected, the above mentioned curve preview will show as a dashed line, indicating that a single click will deselect instead of create a band directly. You can still use double-click or Ctrl-click (Command-click on macOS) to create a band.
- Hold down the Alt key while creating a band using the method above, to create a dynamic band instead of a normal band, or hold down Alt+Shift to create a spectral band.
- You can also create multiple bands with a single mouse gesture via EQ Sketch.
The shape of newly created curves depends on where you click, and once you get used to this, it's a real time-saver! Do you need a Notch curve? Just double-click in the far low area of the display. Want a Low Cut or High Cut filter? Double-click in the far left or far right areas. Shelving filter? Drag the yellow curve at the left or right end of the display.
Selecting bands
- Click the EQ band's dot or the colored area around it to select it.
- Click and drag on the display background to select adjacent bands by dragging a rectangle around them.
- Hold down Ctrl (Command on macOS) and click another dot to select multiple bands. Hold down Shift and click a dot to select a consecutive range of bands.
- Deselect all bands by clicking anywhere on the display background.
Adjusting and editing bands
Once you have selected one or more EQ bands, the display highlights the shapes of the selected bands. You can now of course edit the EQ settings via the floating band controls, but the easiest way to adjust them is simply by dragging them around:
- Click and drag a selected dot to adjust the frequency and gain of all selected bands. If you have multiple bands selected, the gain of all selected bands will be scaled relative to each other.
- For dynamic bands, drag the dynamic range indicator up or down to adjust the dynamic range.
- Move the mouse wheel to adjust the Q setting, making the selected bands narrower or wider. This works while dragging or when the mouse pointer is above a curve. For low/high cut filters, the mouse wheel adjusts the slope instead, setting it to stepped values. Hold the Shift key to set it to any desired fractional slope value.
- Alternatively, adjust the Q of all selected bands by holding down Ctrl (Command on macOS) while dragging vertically.
- Move the mouse wheel while holding down Alt to adjust the dynamic range setting or Ctrl (Command on macOS) to adjust the gain. Hold both Alt and Ctrl (Alt+Command on macOS) to perform a linked change, trading gain for dynamic range.
- Hold down Shift while dragging (or while using the mouse wheel) to fine-tune the settings of the selected bands.
- Hold down Alt while dragging to constrain to horizontal adjustments (frequency) or vertical adjustments (gain or Q, depending on the Ctrl/Command key).
- Hold down Alt and click the dot on an EQ band once to toggle its bypass state (enabling or disabling the band).
- Hold down Ctrl+Alt (Command+Alt on macOS) and click the dot on an EQ band once to change its shape.
- Hold down Alt+Shift and click the dot on an EQ band once to change its slope.
- Double-click a dot to enter values in the EQ parameter display (using the Tab key to step through Frequency, Gain and Q) or double-click the values in the parameter value display directly. Note that you can enter frequencies in various ways, like "100", "2k", "A4" or "C#2+13".
- If you right-click on the dot for an EQ band, a pop-up menu appears with various band settings. This is a quick way to modify the EQ band while you're working in the display.
Copying and pasting bands
You can copy any band or selection of bands by right-clicking on a curve dot, and choosing Copy from the curve menu. Now, you can paste these band in any Pro-Q 4 instance by right-clicking anywhere in the display, and choosing Paste from the menu that appears. To copy all bands, right-click on the background and click Copy from this menu.
To copy and paste all Pro-Q parameters including output settings and processing mode, use the Copy and Paste commands in the preset browser.
EQ parameter display
Next to each EQ band's dot in the display, the EQ parameter display shows the exact parameter values for the EQ band, along with quick controls to bypass or delete a band, enter solo mode, and change its shape. You can double-click a value in the display directly to edit it. You can also click-and-drag or use the mouse wheel above any of the shown parameters to make changes on a band or selection.
When changing slope (shown for LP/HP bands only), hold the Shift key (in Pro Tools: Ctrl on Windows or Command on macOS) to set any fractional slope. Clicking the slope value opens a menu that lets you either click the desired setting, or drag the indicator to choose any in-between value. Click the triangular menu button to access the band menu with more options for the curve.
In case you find the EQ parameter display to be distracting, you can turn it off via the Show EQ Parameter Display option on the Help menu.
Display range
Note that two display scales are drawn: the yellow scale corresponds to the EQ band curves and yellow overall curve. The gray scale at the far right is used by the spectrum analyzer and output level meter. In the top-right corner of the display at the top of the yellow scale, there is a drop-down button to choose the display range: +/- 3 dB, 6 dB, 12 dB or 30 dB. When you are dragging a curve outside the current range of the display, the range will expand automatically as needed.
Horizontal zooming
Sometimes it might be useful to zoom in to a specific frequency for extra precise editing. You can easily do this by clicking and dragging the frequency scale at the bottom of the EQ display, just above the bottom bar. You can do the following:
- Click and drag up and down to zoom in and out at the frequency you have clicked on.
- While zoomed in, you can also drag left and right to move the frequency scale.
- Just double-click the scale to return to its default full range.
Tips
- Don't like the curve previews in the display? You can disable this feature via the Auto-EQ Sketch option in the Help menu.
- In Full Screen mode, available via the button at the right top of the interface, the EQ display will fill the whole screen so you can make very precise adjustements. See Full Screen mode and resizing.
- To quantize a frequency without using the piano display, just double-click a curve dot in the display or the Frequency knob in the EQ controls, and enter a value like "A4" or "C#2".
- It is possible to turn off the automatic adjustment of the display range via the Auto-Adjust Display Range option on the Help menu.
- Even though frequencies above 20 kHz are generally inaudible, the display extends to 30 kHz so you can put filters above this limit. The left part of the filter, extending into the audible frequency spectrum, still affects the sound. This gives you even more possibilities to shape the frequency response of the equalizer just the way you need it.
Next: EQ Sketch
See Also
Dynamic EQ
Instance list
EQ Sketch
Spectrum Grab