FabFilter Pro-Q 4 online help
Table of contents
Go to sectionFabFilter Pro-Q 4 Help
Introduction
Using FabFilter Pro-Q 4
Full Screen mode, resizing and scaling
Presets
Purchasing FabFilter Pro-Q 4
Support
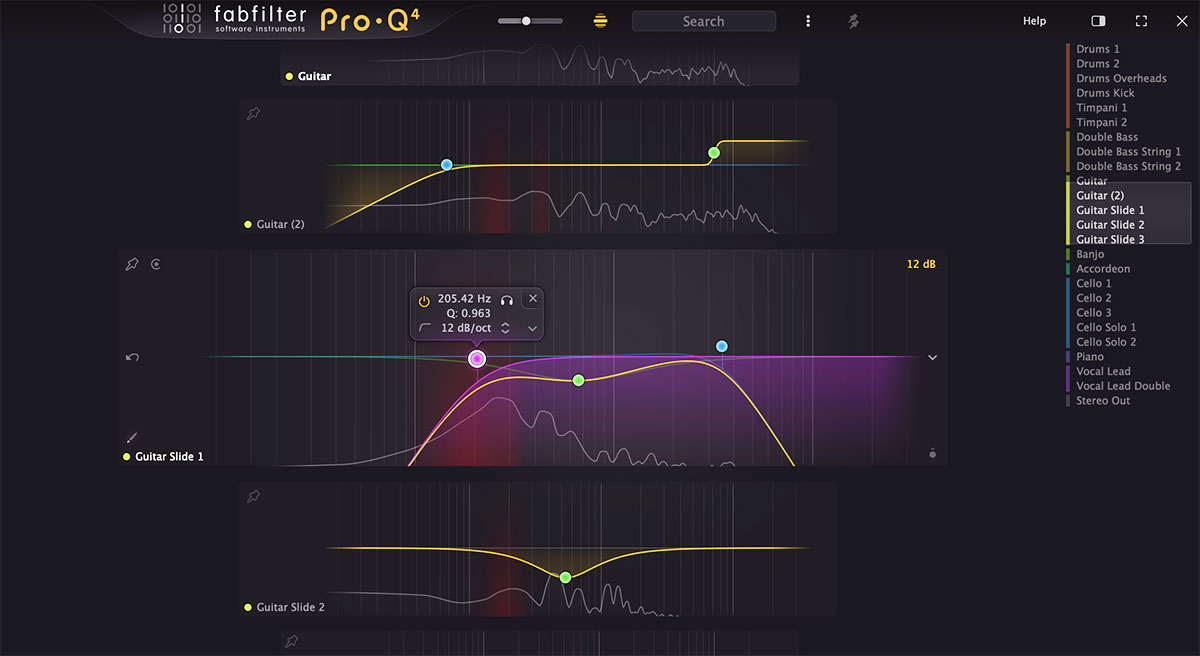
Instance List
With Pro-Q 4, you can now control all Pro-Q 4, Pro-C 3, Pro-DS and Pro-G (more to follow) instances in your session, from a single plug-in interface. This is a huge time-saver, making it much easier to set up an initial mix when starting a session. It's like having a multi-track FabFilter channel strip plug-in!
The basics
- Just click the instance button (showing the current track name) at the center of the bottom bar to open the instance list: an overview of all Pro-Q 4, Pro-C 3, Pro-DS and Pro-G instances in your session, organized per track, matching the track order in your DAW*.
- Instances will order themselves according to how they are inserted on the track on start/stop in your DAW*.
- Zoom levels: Choose the zoom level you like using the zoom slider at the top of the interface. At the smallest zoom levels, the plug-ins show only the most basic controls. For example, Pro-Q 4 will only show spectrums of the instances, plus possible collisions of course, and Pro-C 3 only Threshold and Wet Gain knobs.
- Instances will get more functionality as zoom levels increase, from only the essentials, to almost full functionality. In Pro-Q 4, you will first see the result curves on top of the spectrums and at the higher zoom levels, you can interact with the EQ curve like you would in a normal interface, clicking or dragging to create and adjust curves. You can even use the new EQ Sketch feature here, which makes it a lightning-fast way to setup initial EQing in your mix session.
- Next to the zoom level slider, you can enable or disable auto-zoom. When enabled, a track with instances will automatically zoom in when you hover above it, so you can edit them directly.
- You can also easily filter currently shown tracks using the filter text field at the top, which filters the listed tracks as you type.
- Using the Options button at the right of the filter text field, you can also choose Quick Jump. This will open a floating panel, which lets you search for a track by name, and scrolls to that track when you select it, without actually filtering the list. Here, you can also choose what happens when you start typing when you're in the Instance List. You can choose between Type to Filter to start filtering tracks, or Type to Quick Jump to easily scroll to the track you need to work on.
- The Filter Pinned button toggles between showing only pinned tracks, or all tracks.
- If there are many tracks in your session, a minimap appears at the right top, which makes it easy to navigate the list by clicking and dragging or via the mouse wheel. The minimap will also show which tracks are pinned at the moment. You can show or hide the minimap using the Show Minimap button next to the Full Screen button at the right top.
- The Close button at the right top of the interface closes the instance list and reverts back to the normal interface. Alternatively, you can also use the Esc key to exit the instance list.
Working with instances
-
When hovering over the instance item, some additional buttons will appear for the instance
and the track it's on:
- Using the bypass button at the left top, you can easily enable or disable a plug-in.
- Via the output button at the right bottom, you get access to output settings of an instance, like level/panning settings, etc. Above the output level knob, you will see the emphasize button. Click it to momentarily raise the instance level; it can help you identify which tracks you are working on in a complex mix with many instances.
- A maximize button appears in the larger zoom levels, at the left top of the instance, next to the bypass button, which enlarges the track to maximum level. Clicking in the empty space left or right of the items will unzoom it again. At the smallest zoom levels (where you cannot edit the Pro-Q 4 instances) just clicking in an instance will make it active and zoom the track to maximum level, making it easy to do precise adjustments.
- The Menu button at the center right of an instance item, gives you access to the preset menu of the plug-in and various options like copy/paste (and in Pro-Q 4: starting EQ Match). If there are multiple tracks with the same track color, it offers a Pin Similar Colors command to pin all tracks with this color.
- By default, the track name at the left (and color if possible*) is set automatically based on information from your DAW, but you can always double-click a track name to customize it in the instance list as you like.
- You can pin tracks via the pin icon, and then filter on all pinned tracks using the Filter Pinned button at the top of the interface. You can save and restore sets of pinned tracks via the options button in the toolbar. Use Shift-click to pin a range of tracks, or Alt-click to pin one track uniquely.
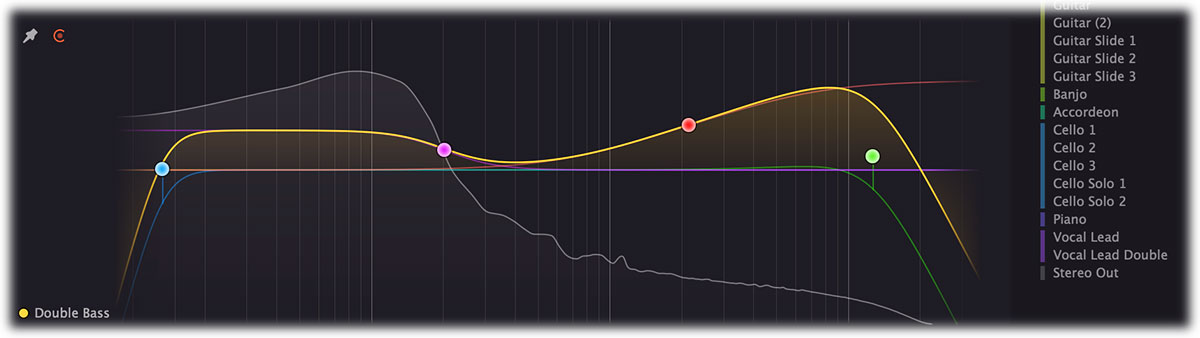
- When editing a Pro-Q 4 instance, you can add and change curves just like you are used to in the normal EQ display, but without the band controls panel. You can change curve values by dragging curve dots or values in the parameter value display. In addition, right-click a curve dot to open the curve menu, which offers the possibility to change the speaker set and stereo placement, make a curve dynamic or spectral, and more.
- The instance list is now also the way to detect collisions. By default, the main track you are on now, is the collision reference; this is indicated by the red collision reference icon right above the track name. Pro-Q instances on other tracks will show collisions with the (last) Pro-Q 4 instance on this reference track. You can change any track into the collision reference by clicking the collision reference button of another track, which appears when hovering above it. This also sets which external spectrum is shown in the main interface.
*Notes
To pull all this off, we're relying on some plug-in format- and DAW-specific features. The Instance List might show and work slightly different, depending on your DAW of choice. We've tested in many DAWs, like Pro Tools, Logic Pro, Ableton Live, Studio One, Cubase, FL Studio and Reaper. In most cases, the instance list knows the track order, color of the tracks and order of instances. This makes it possible to show instance items properly, with colored dots representing the track color.
Unfortunately, some of this functionality is not (or not yet) supported properly, or supported poorly in some plug-in formats or DAWs. In that case, the Instance List falls back to ordering tracks by name instead. We are in direct contact with the development teams for both Logic Pro and Pro Tools and will hopefully be able to get this implemented for AAX and Audio Units as well.
These are some of the known issues in DAWs:
- Pro Tools: Only communicates the proper track positions since version 2025.12. Track color information is not yet available.
- Audio Units (e.g. Logic Pro): Track colors and ordering are not used in the Audio Units plug-ins, since the format doesn't support communicating these to the plug-in yet. Tracks will be ordered alphabetically.
- FL Studio: Plug-ins (both CLAP and VST) possibly won't re-order instances correctly when some of them introduce latency. And CLAP in FL Studio doesn't have support for communicating track name and location info yet.
If instances are not shown in the correct order on a track, stopping and restarting playback in your host will fix this.
Tips
- The best way to use the instance list is in Full Screen mode, where you can make precise adjustments and get the best overview of all instances.
- You can drag and drop preset files from Windows Explorer or the Finder on Mac onto an instance to load the preset. Drag and drop an audio file to start EQ Match on the instance, using the audio file as the reference spectrum.
Next: Solo
See Also
Overview
EQ Sketch
Display and workflow