FabFilter Twin 3 online help
Table of contents
Go to sectionFabFilter Twin 3 Help
Introduction
Using FabFilter Twin 3
Drag-and-drop modulation slots
Polyphony, unison and microtuning
Full Screen mode, resizing and scaling
Presets
Purchasing FabFilter Twin 3
Support
Filters
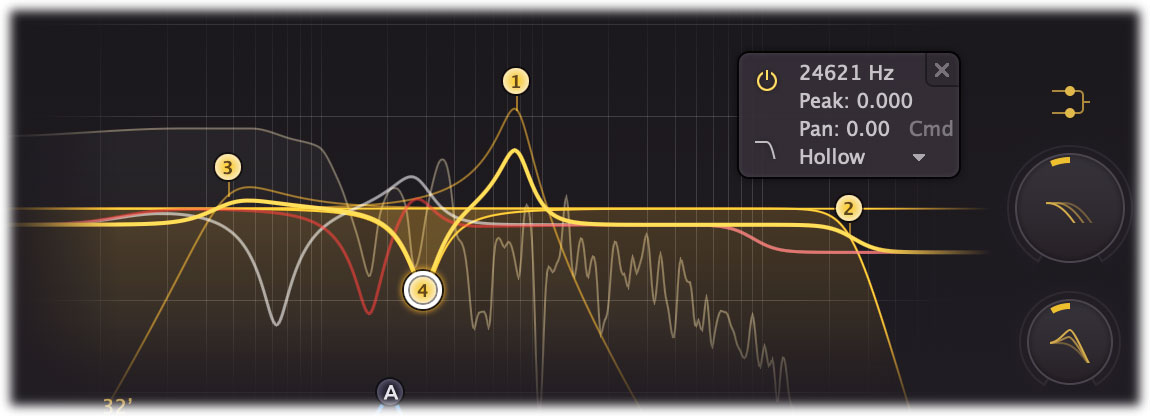
The interactive filter display at the center of the interface lets you add up to four high-quality, analog-like, self-oscillating filters, full of character and with internal saturation. The thick yellow curve shows the overall frequency response of the filters. All filter parameters can be easily controlled via the display, either by clicking and dragging, or via the parameter value display. Here's how it works.
Creating filters
- To add a new filter, simply click on the yellow overall curve and drag it up or down.
- Alternatively, double-click or Ctrl-click (Command-click on macOS) on the display background.
The shape of newly created curves is determined automatically depending on where you click or drag, and once you get used to this, it's a real time-saver! Do you need a notch? Just double-click in the far low area of the display. Want a high- or a low-pass filter? Just drag the curve in the left or right part of the display. Of course, you can also set the shape via the parameter value display. The available shapes are: Low/High Pass, Band Pass, Bell, Low/High Shelf and Notch. The slope can be set to 6dB, 12 dB, 24dB or 48 dB/oct.
Selecting filters
- Click the filter's dot or the colored area near it to select it.
- Click and drag on the display background to select adjacent filters by dragging a rectangle around them.
- Hold down Ctrl (Command on macOS) and click another dot to select multiple filters. Hold down Shift and click a dot to select a consecutive range of filters.
Adjusting and editing filters
Once you have selected one or more filters, the display highlights the shapes of the selected curves. You can easily make adjustments by simply dragging them around:
- Click and drag a selected dot to adjust the frequency and peak of all selected filters. If you have multiple bell or shelf filters selected, the peak of all selected filters will be scaled relative to each other.
- Move the mouse wheel to adjust the slope of filters, making the selected filters narrower or wider. This works while dragging or when the mouse pointer is above a curve. Alternatively, adjust the slope of all selected filters by holding down Ctrl (Cmd on macOS) while dragging vertically.
- Move the mouse wheel while holding down Ctrl (Cmd on macOS) to adjust the peak.
- Hold down Ctrl (Cmd on macOS) and drag horizontally to adjust frequency panning of the selected filters. Filter panning lets you filter the left and right channels differently. It works as a stereo balance setting for the center frequency of the filter. For example, when you set panning to a negative value, the left channel will be filtered with a lower center frequency, and the right channel will be filtered with a higher center frequency. You can use this to create various stereo filtering effects, especially in combination with modulation.
- Hold down Shift while dragging (or while using the mouse wheel) to fine-tune the settings of the selected filters.
- Hold down Alt while dragging to constrain to horizontal adjustments (frequency) or vertical adjustments (gain).
- Hold down Alt and click the dot on a filter once to toggle its bypass state (enabling or disabling the filter).
- Hold down Ctrl+Alt (Cmd+Alt on macOS) and click the dot on a filter once to change its shape.
- Hold down Alt+Shift and click the dot on a filter once to change its slope.
- Double-click a dot to enter values in the parameter display (using the Tab key to step through Frequency, Peak and Pan) or double-click the values in the parameter value display directly. Note that you can enter frequencies in various ways, like "100", "2k", "A4" or "C#2+13".
- If you right-click on the dot for a filter, a pop-up menu appears with various filter settings. This is a quick way to modify the filter while you're working in the display.
Frequency Offset and Peak Offset knobs
At the right of the filter display, two large knobs let you offset the frequency and peak of all filters at once, which quickly adjusts the sound for any preset you load. And of course, these can be modulated as well.
Filter parameter display
Next to each filter's dot in the display, the parameter display shows the exact parameter values for the filter. By default, it only shows the frequency (to save space and make it easier to select multiple filters) but when you hover above it, it extends and lets you control all the filter parameters. You can easily bypass or delete filters or change the shape, slope or style. You can double-click the values in the display directly to edit them.
Most of the filter parameters (frequency, peak, panning), can be modulated. Just drag a source to a line in the parameter value display or to the filter dot directly (to modulate the frequency). If multiple filters are selected, a slot will be added for each filter, so you can easily setup modulation for multiple filters at once.
Filter Styles
FabFilter Twin 3 lets you choose between 11 different filter styles:
- FabFilter One, the original filter characteristic taken from our award-winning FabFilter One synthesizer
- Smooth, like the cream in your coffee
- Raw, a filter with lots of overdrive and exhibits a character of its own
- Hard, moderately distorting filter, with a nice clean whistle
- Hollow, juicy moderate distortion with fairly much low-end self-oscillation
- Extreme, for more wild sonic ideas
- Gentle, a more smooth and clean general purpose characteristic
- Tube, with a warmer sound and nice overdrive, great for synth sounds
- Metal, with a rough, sharper sound and distortion
- Easy Going, a softer version of the Tube filter
- Clean, linear behavior with no clipping or distortion at all
Filter Routing
Use the Filter Routing button at the right, above the frequency/peak offset knobs, to change the routing of the filters. There are three different setups:
- Serial: the sound passes through both filters serially. So the sound of all oscillators are led through filter 1 and then through filter 2
- Parallel: the sound is led through both filters in parallel and the result is then mixed together after the filters
- Per Oscillator: the output of oscillator 1 goes through filter 1, the output of oscillator 2 goes through filter 2, etc
Tips
- When filter modulation is taking place, the display will show the modulated result curve as a thin yellow curve that gets fuzzy for quick modulation.
- If filter panning is in effect, additional result curves will show the overall filtering curve for each channel (white for left, red for right).
Next: FX Section
See Also
Oscillators
Modulation
Overview